Q-Learning Project
Project Material
Objectives
Your goal in this project is to implement a Q-Learning algorithm to give your robot the ability to learn how to organize items in its environment using reinforcement learning. This project will also involve components of both:
- Perception: Detecting items to organize and locations for drop-off
- Control: Making the robot arm pick up the items and navigate to the drop-off locations
Learning Goals
- Continue gaining experience with ROS2 and robot programming
- Gain experience with robot perception using the robot's RGB camera to identify objects and drop-off locations
- Learn about robot manipulation through programming a multiple degree-of-freedom robot arm
- Gain experience and intuition with reinforcement learning through a hands-on implementation of the Q-Learning algorithm
Teaming & Logistics
You are expected to work with 1 other student for this project, who is different than your particle filter project partner. If you strongly prefer working by yourself, please reach out to the teaching team to discuss your individual case. A team of 3 will only be allowed if there is an odd number of students. Your team will submit your code and writeup together (in 1 Github repo).
If you are looking for a partner, send a Slack message in the channel #find-project-partner.
For questions please post them in the #q-learning-project channel.
Deliverables
Like last project, you'll set up your code repository using GitHub Classroom and submit your work on Gradescope (accessible via Canvas). The invite link to the GitHub Classroom can be found via the Canvas assignment for the Q-Learning Project.
You'll want to put the q_learning_project git repo within your ~/intro_robo_ws/src/ directory (where ROS2 packages should be located). Both partners will contribute to the same GitHub repo.
Implementation Plan
Please put your implementation plan within your README.md file. Your implementation plan should contain the following:
- Names: The names of your team members
-
Implementation and Testing: A 1-2 sentence description of how your team plans to implement each of the following components of this project as well as a 1-2 sentence description of how you will test each component to ensure it's working correctly:
-
Q-learning algorithm
- Executing the Q-learning algorithm
- Determining when the Q-matrix has converged
- Once the Q-matrix has converged, how to determine which actions the robot should take to maximize expected reward
-
Robot perception
- Determining the identities and locations of the three colored objects
- Determining the identities and locations of the three AR tags
-
Robot manipulation & movement
- Picking up and putting down the colored objects with the OpenMANIPULATOR arm
- Navigating to the appropriate locations to pick up and put down the colored objects
-
Q-learning algorithm
- Timeline: A brief timeline sketching out when you would like to have accomplished each of the components listed above.
Writeup
Modify the README.md file as your writeup for this project. Your writeup should contain the sections listed below.
- Objectives description (2-3 sentences): Describe the goal of this project.
- High-level description (1 paragraph): At a high-level, describe how you used reinforcement learning to solve the task of determining which colored objects belong in front of each AR tag.
- Q-learning algorithm description: Describe how you accomplished each of the following components of the Q-learning algorithm in 1-3 sentences, and also describe what functions / sections of the code executed each of these components:
- Selecting and executing actions for the robot (or phantom robot) to take
- Updating the Q-matrix
- Determining when to stop iterating through the Q-learning algorithm
- Executing the path most likely to lead to receiving a reward after the Q-matrix has converged on the turtlebot - we do not require that you include this item by the intermediate deliverable deadline, however, you should complete it by the deadline of the entire project
- Robot perception description: Describe how you accomplished each of the following components of the perception elements of this project in 1-3 sentences
and also describe what functions / sections of the code executed each of these components (1-3 sentences per function / portion of code):
- Identifying the locations and identities of each of the colored objects
- Identifying the locations and identities of each of the AR tags
- Robot manipulation and movement: Describe how you accomplished each of the following components of the robot manipulation and movement elements of this project in 1-3 sentences, and also describe what functions / sections of the code executed each of these components (1-3 sentences per function / portion of code):
- Moving to the right spot in order to pick up a colored object
- Picking up the colored object
- Moving to the desired destination (AR tag) with the colored object
- Putting the colored object back down at the desired destination
- gif or Embedded Video: Include one gif or embedded video of your robot successfully executing the task once your Q-matrix has converged. While not required, we encourage you to include additional photos, gifs, and/or videos throughout your writeup to illustrate your implementation and results.
- Challenges (1 paragraph): Describe the challenges you faced and how you overcame them.
- Future work (1 paragraph): If you had more time, how would you improve your implementation?
- Takeaways (at least 2 bullet points with 2-3 sentences per bullet point): What are your key takeaways from this project that would help you/others in future robot programming assignments working in pairs? For each takeaway, provide a few sentences of elaboration.
Code
Following the GitHub Classroom invitation (located on the Canvas Particle Filter Project assignment), create a GitHub repository for your team for this project, clone it within your ~/intro_robo_ws/src directory, re-build, and source the install/setup.bash file.
The starter code comes with 2 ROS2 packages. The first is q_learning_interfaces, which contains the custom message files we'll be using:
q_learning_project/q_learning_interfaces/msg/QLearningReward.msg
q_learning_project/q_learning_interfaces/msg/RobotMoveObjectToTag.msg
The second ROS2 package we'll be using is the q_learning_project, which contains the Python scripts and all other files you'll be using for this project. This package comes with some files that YOU SHOULD NOT EDIT, which includes three matrices defining the states and actions of the world and a reward simulator that you can execute on the terminal to get feedback on the actions your robot is taking during training (terminal_reward_simulator.py)
q_learning_project/q_learning_project/matrices/action_matrix.txt
q_learning_project/q_learning_project/matrices/actions.txt
q_learning_project/q_learning_project/matrices/states.txt
q_learning_project/q_learning_project/q_learning_project/terminal_reward_simulator.py
Finally, within the q_learning_project, you'll be doing most of your work in q_learning.py, which we've started for you, but left mostly empty. You'll also need to create a separate file called execute_policy.py to execute the learned policy once your Q-matrix has converged.
q_learning_project/q_learning_project/q_learning_project/q_learning.py
q_learning_project/q_learning_project/q_learning_project/execute_policy.py
Partner Contributions Survey
The final deliverable is ensuring that each team member completes the Partner Contributions Google Survey. The purpose of this survey is to accurately capture the contributions of each partner to your combined q-learning project deliverables.
Grading
The Partile Filter Project will be graded as follows:
- 5% Implementation Plan
-
20% Writeup
- 4% Objectives, High-level description, & gif/video
- 13% Main steps
- 3% Challenges, Future Work, Takeaways
- 20% Individual Contribution to Team
- 55% Code
- 19% Q-Learning
- 3% Properly utilizing state and action matrices
- 9% Executing the Q-learning algorithm
- 4% Q-learning convergence
- 3% Executing the correct sequence of actions once the Q-matrix has converged
- 28% Movement & Perception
- 4% Identification of the colored tubes
- 4% Identification of the AR tags
- 10% Picking up & putting down the colored tubes
- 7% Moving to the right spot to pick up the colored tubes
- 7% Moving to the right spot to put down the colored tubes
- 4% Code Comments + Readability
- 19% Q-Learning
Deadlines & Submission
- Thursday, October 30 8:00pm - Implementation Plan
- Tuesday, November 4 8:00pm - Q-Matrix (intermediate deliverable)
- Writeup: Complete the writeup sections: objectives description, high-level description, and Q-learning algorithm description.
- Code: Completion of the Q-Learning training portion of the project. Your Q-matrix should converge and be saved to the
q_matrix.txtfile specified in the starter code.
- Tuesday, November 11 8:00pm - Everything: Code, Writeup, gif, Partner Contributions Survey
Your Objective
Your goal in this project is to computationally determine what actions the robot should take in order to achieve the goal state (where each colored object is placed in front of the correct AR tag) using reinforcement learning. Conceptually, your program will consist of two phases:
- Training: During this phase, you will be ONLY training your Q-matrix via reinforcement learning. This phase will stop once you have determined your Q-matrix has converged.
- Policy Execution: In this phase, you will use your converged Q-matrix to guide the robot towards the goal state. Your robot will have to pick up, move, and place each colored item in accordance with the optimal policy given your converged Q-matrix.
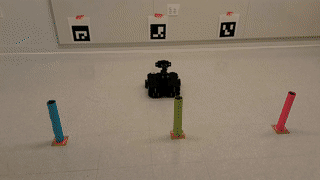
Once complete, your project could look like the following past example using the Turtlebot3:
Training Your Robot with Q-Learning
Your goal in this project is to computationally determine what actions the robot should take in order to achieve the goal state (where each colored object is placed in front of the correct AR tag) using reinforcement learning, and specifically, Q-learning. You will implement your Q-learning algorithm in the q_learning.py file within the q_learning_project ROS2 package we've provided.
Q-Learning Algorithm
\(\textrm{Algorithm Q_Learning}:\)
\( \qquad \textrm{initialize} \: Q \)
\( \qquad t = 0 \)
\( \qquad \textrm{while} \: Q \: \textrm{has not converged:} \)
\( \qquad \qquad \textrm{select} \: a_t \: \textrm{at random} \)
\( \qquad \qquad \textrm{perform} \: a_t \)
\( \qquad \qquad \textrm{receive} \: r_t \)
\( \qquad \qquad Q(s_t, a_t) \leftarrow Q(s_t, a_t) + \alpha \cdot \Big( r_t + \gamma \cdot \: \textrm{max}_a Q(s_{t+1}, a) - Q(s_t, a_t) \Big)\)
\( \qquad \qquad t = t + 1\)
Where:
- \(Q: S \times A \rightarrow \mathbb{R} \), meaning that for a given state \( (s_t) \) and action \( (a_t) \), \(Q(s_t, a_t)\) is a real number \((\mathbb{R})\).
- \(s_t \in S\) represents the state space - all possible states of the world.
- \(a_t \in A\) represents the action space - all possible actions the robot could take.
- \(r_t \) is the reward received when action \(a_t\) is taken from state \(s_t\) according to the reward function \(r(s_t, a_t)\).
- \(\alpha\) represents the learning rate \((0 \le \alpha \le 1) \), the closer to 1 the learning rate is, the more rapidly your Q-matrix will update to observed rewards; for this project it is recommended that you start out with \( \alpha = 1\), if you want to experiment with the learning rate, we'd recommend doing that only after have a fully working Q-learning algorithm with \( \alpha = 1\).
- \(\gamma\) is the discount factor where \((0 \le \gamma \le 1) \), which indicates how much future rewards are considered in the actions of a system, \(\gamma = 0\) would indicate a scenario in which a robot only cares about the rewards it could get in a single moment, as where \(\gamma = 1\) indicates a scenario where the robot doesn't care at all about the short term and pursues whatever actions will produce the best long-term reward (regardless of how long that takes), for this project, we recommend choosing a value for \(\gamma\) somewhere in between 0 and 1.
ROS Topics & Messages
You will need to publish and subscribe to several ROS2 topics to complete your Q-learning task. These topics will use message types defined in the q_learning_interfaces package included in the starter code. Remember that these ROS2 topics will use the prefix corresponding with the robot number you're working with (e.g. /tb10/ for TB10). The relevant topics and message types are summarized in the table below:
| ROS2 Topic | ROS2 msg Type | Notes |
/tb10/q_learning/reward |
q_learning/QLearningReward |
You will subscribe to this topic to receive from the environment the reward after each action you take. |
/tb10/q_learning/robot_action |
q_learning/RobotMoveObjectToTag |
Every time you want to execute an action, publish a message to this topic (this is the same topic you'll be subscribing to in the node you write to have your robot execute the actions). |
Setting Up the Q-matrix and the Action Matrix
For this project, we will represent \(Q\) as a matrix, where the rows correspond with the possible world states \(s_t\) and the columns represent actions the robot can take \(a_t\). The actions that the robot can possibly take is available through self.actions in q_learning.py of the starter code. It is organized as follows:
| action number (column) | move object | to tag ID |
| 0 | pink | 1 |
| 1 | pink | 2 |
| 2 | pink | 3 |
| 3 | green | 1 |
| 4 | green | 2 |
| 5 | green | 3 |
| 6 | blue | 1 |
| 7 | blue | 2 |
| 8 | blue | 3 |
There are 64 total states for the system to be in, which is also available to you in self.states within q_learning.py:
| state number (row) | pink object location | green object location | blue object location |
| 0 | origin | origin | origin |
| 1 | tag 1 | origin | origin |
| 2 | tag 2 | origin | origin |
| 3 | tag 3 | origin | origin |
| 4 | origin | tag 1 | origin |
| 5 | tag 1 | tag 1 | origin |
| 6 | tag 2 | tag 1 | origin |
| 7 | tag 3 | tag 1 | origin |
| 8 | origin | tag 2 | origin |
| 9 | tag 1 | tag 2 | origin |
| 10 | tag 2 | tag 2 | origin |
| 11 | tag 3 | tag 2 | origin |
| 12 | origin | tag 3 | origin |
| 13 | tag 1 | tag 3 | origin |
| 14 | tag 2 | tag 3 | origin |
| 15 | tag 3 | tag 3 | origin |
| ... | ... | ... | ... |
| 63 | tag 3 | tag 3 | tag 3 |
Where
- states 16 - 31 repeat states 0-15, except with the blue object location at tag 1,
- states 32 - 47 repeat states 0-15 except with the blue object location at tag 2, and
- states 48 - 63 repeat states 0-15 except with the blue object location at tag 3.
In addition to a Q-matrix, we have provided you with an action matrix, available through self.action_matrix in q_learning.py. The rows of the action matrix represents a starting state \((s_t)\) and the columns of the action matrix represents the next state \((s_{t+1})\). The matrix is set up such that \(\textrm{action_matrix}[s_t][s_{t+1}] = a_t \). Let's examine the example of \(\textrm{action_matrix}[0][12] = 5 \). In this case \(s_t = 0\), where all three colored objects are at the origin, and \(s_{t+1} = 12\), where the pink and blue objects are at the origin and the green object is at tag 3, and \(a_t = 5\) which is the action corresponding with the robot taking the green object to tag 3.
All transitions from \(s_t\) to \(s_{t+1}\) that are impossible or invalid are assigned a value of -1. For example, since the robot can only carry one colored object at a time, the transition from state 0 to 6 is impossible. Additionally, only one object can sit in front of one AR tag at a time, so any transition to state 5 (where both the pink and green objects are at tag 1) is also impossible and is assigned the value -1.
The value of having this action matrix comes into play when we're executing the \( \textrm{select} \: a_t \: \textrm{at random} \) step of the Q-learning algorithm. In order to select a random action, we take our current state \((s_t)\), and look up the row corresponding with that state in the action matrix. All the values that are not -1 represent valid actions that the robot can take from state \(s_t\). You can then pick one of these at random.
Q-Matrix Convergence
As highlighted in the Q-learning algorithm, you will iterate through the while loop, updating your Q-matrix, until your Q-matrix has converged. What we mean by "convergence" in this context is that your Q-matrix has reached its final form and no more updates or changes will occur to it. It's up to you to determine when your Q-matrix has converged.
Simulating Rewards During Training
In order to reach convergence of your Q-matrix, you're going to have to run many simulated iterations of the robot placing the colored objects in front of the AR tags and receiving the corresponding reward. To avoid having to do this with the physical robot (which would take a loooong time), we've created a ROS2 node that can help you quickly iterate through the Q-learning algorithm: terminal_reward_simulator.py, which you can run on the terminal with:
$ ros2 run q_learning_project terminal-reward-simulatorThe terminal_reward_simulator.py works by responding to robot actions given on the /tb10/q_learning/robot_action ROS2 topic and publishes rewards to the /tb10/q_learning/reward topic based on the actions it receives, simulating what would happen in the real world. If you are operating it correctly, you should see an output like the following:
Received action: robot_object=blue tag_id=3
Published reward:  0
Received action: robot_object=pink tag_id=2
Published reward:  0
Received action: robot_object=green tag_id=1
Published reward:  0
Resetting the world
Received action: robot_object=blue tag_id=3
Published reward:  0
Received action: robot_object=pink tag_id=1
Published reward:  0
Received action: robot_object=green tag_id=2
Published reward:  0
Resetting the world
Saving the Q-Matrix & Communicating It to the Next Phase
Training the Q-matrix will often take some time and communicating this matrix to the next phase of operations could lead to issues. Therefore, you will save your Q-matrix to q_matrix.txt as outlined in the starter code. The policy execution phase of this project will need to read/load the trained Q-matrix via this file.
Policy Execution: Picking Up Colored Objects and Placing them in Front of AR Tags
The second component of this project is building a ROS2 node that can execute an optimal policy (actions) based on the Q-Matrix. These actions will be published to the /tb10/q_learning/robot_action ROS2 topic (with a custom message type of q_learning/RobotMoveObjectToTag). When your ROS2 node receives a message on this topic, it should:
- Move to and pick up the colored object specified by the
robot_objectattribute of theq_learning/RobotMoveObjectToTagmessage - Carry the colored object to the tag specified by the
tag_idattribute of theq_learning/RobotMoveObjectToTagmessage, and - Put the colored object down.
Write your code for this node in a new Python file named execute_policy.py within the intro_robo_ws/src/q_learning_project/q_learning_project/q_learning_project directory. This code should read in the Q-Matrix you saved from the last step and execute the actions that will reap the highest expected reward. The following subsections will give you some more details and helpful tips on the perception and robot manipulator control components to programming these robot actions.
Executing the Optimal Policy: Selecting Robot Actions that Maximize Future Reward
Once your Q-matrix converges and has been saved to the q_matrix.txt file, you now have a Q-matrix that contains information about future expected reward for robot actions. You can now use the Q-matrix to execute a policy that will lead to the highest expected future reward. To do this, load your Q-matrix, take your current state \(s_t\) and look up the corresponding row in your Q-matrix. In this row, find the action (column) that corresponds with the highest Q-value. This is the action that will lead to the highest expected future reward.
Perception
In order to pick up the colored objects and carry them to the AR tags, your robot will need to be able to perceive:
- Each of the three colored objects and their locations, and
- Each of the three AR tags and their locations
Compressed Image Topic: You may find it helpful to use the compressed image topic instead of the raw image topic for processing camera images. We've pulled out the 3 lines of code that are different when using the raw vs. compressed image.
Code using the raw image:
# imports
from sensor_msgs.msg import Image

# subscriber
    self.image_sub = self.create_subscription(
      Image,
      f'/tb{ros_domain_id}/oakd/rgb/preview/image_raw',
      self.image_callback,
      10
    )

# within the call back function - getting the image
image = self.bridge.imgmsg_to_cv2(msg, desired_encoding='bgr8')
Code using the compressed image:
# imports
from sensor_msgs.msg import CompressedImage
# subscriber
self.image_sub = self.create_subscription(
CompressedImage,
f'/tb{ros_domain_id}/oakd/rgb/preview/image_raw/compressed',
self.image_callback,
10
)
# within the call back function - getting the image
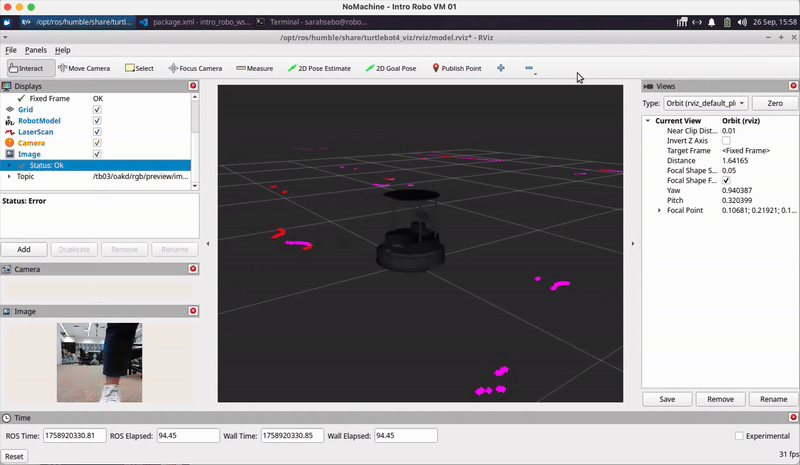
image = self.bridge.compressed_imgmsg_to_cv2(msg, desired_encoding='bgr8')Visualizing Robot Sensor Info: You may also find it helpful to use RViz to visualize what your robot is perceiving using ros2 launch turtlebot4_viz view_model.launch.py namespace:=/tb03 as we covered in Class Meeting 2 and shown below:
AR Tag Recognition
The AR tags you will be identifying in this exercise come from the ArUco library, which is implemented in OpenCV as its aruco module. ArUco markers come in sets known as dictionaries, which are defined by the size of the markers and the number of markers in the set. In particular, the three tags we are using are tags 1, 2, and 3 from the dictionary DICT_4X4_50 (a set of 50 4x4 markers).
Here's an example of how you can use the cv2.aruco module to detect AR tags in an image:
import cv2

# load DICT_4X4_50
aruco_dict = cv2.aruco.Dictionary_get(cv2.aruco.DICT_4X4_50)

.
.
.

# search for tags from DICT_4X4_50 in a GRAYSCALE image
corners, ids, rejected_points = cv2.aruco.detectMarkers(grayscale_image, aruco_dict)

# corners is a 4D array of shape (n, 1, 4, 2), where n is the number of tags detected
# each entry is a set of four (x, y) pixel coordinates corresponding to the
# location of a tag's corners in the image

# ids is a 2D array array of shape (n, 1)
# each entry is the id of a detected tag in the same order as in corners

# rejected_points contains points from detected tags that don't have codes matching the dictionary
For more information, please visit the documentation. Although the tutorial is written for C++, you can find headers for the equivalent Python functions under their respective function documentations.
cv2 that looks like the following: A module that was compiled using NumPy 1.x cannot be run in NumPy 2.2.6 as it may crash. To support both 1.x and 2.x versions of NumPy, modules must be compiled with NumPy 2.0. Some module may need to rebuild instead e.g. with 'pybind11>=2.12'.
If you are a user of the module, the easiest solution will be to downgrade to 'numpy<2' or try to upgrade the affected module. We expect that some modules will need time to support NumPy 2.
...
File "/home/sarahsebo/intro_robo_ws/build/lab_b_line_follower/lab_b_line_follower/line_follower.py", line 5, in
import cv2
ImportError: numpy.core.multiarray failed to import
[ros2run]: Process exited with failure 1 $ pip3 install numpy==1.26.4Robot Manipulator Control
In order to enable your robot to pick up the colored objects (paper towel tubes), you'll need to get familiar with programming the Turtlebot4's OpenMANIPULATOR arm. Here's a list of resources to help you get up and running:
- The our class's exercises from Class Meeting 09 and Lab E
- The Operation page of the OpenManipulatorX manual
- The MoveIt 2 tutorials
The following gif shows an example of the Turtlebot3 with OpenMANIPULATOR moving to and picking up a colored tube.

Tips:
- Use GUIs discussed in Class Meeting 09 and Lab E to find the appropriate joint angles for picking up and putting down the colored objects.
- Do not squeeze the objects too much with your gripper.
Acknowledgments
The design of this course project was influenced by Brian Scassellati and his Intelligent Robotics course taught at Yale University. Also, I want to thank my sister, Rachel Strohkorb, for creating the custom dumbbell model for our use in the Gazebo simulator for the quarters this course has offered a simulation environment.