
Each lab will consist of a small problem and details of how to proceed. Each lab is intended to give every student hands-on experience with the core concepts and technologies covered during the course. A student may concentrate, as a team member, on one technology over another for the final project, but labs are designed to give each and every student exposure to all the technologies that come into play. You need to submit labs to the TAs for grading--see submission instructions below. Generally, unless otherwise specified, you will have one week to complete each assigned lab.
See the syllabus for information on grading. Turning in lab assignments on time is required, without exception, and all late deliveries will be penalized, regardless of cause. Submit your assignments to the subversion repository according to the directions on the syllabus page.
Lab 5 Due: 4:00 pm, Monday, July 24, 2023
Problem
1: Smart Contracts and Testing:
BACKGROUND:
STEP 1:
At the command line, let's create a new directory (you can of
course choose where you want to store your source code) and cd
into it:
$ mkdir -p ~/56605/src/LABS/Lab.5/MPCSTesting
$ cd ~/56605/src/LABS/Lab.5/MPCSTesting
STEP 2:
Now we want to run "truffle init" (you installed truffle in Lab
1 and played around with it in Lab 4) in our new MPCSTesting
directory:
$ truffle init
After running init, see what new files have appeared in your
directory:
$ find .
.
./migrations
./migrations/1_initial_migration.js
./test
./test/.gitkeep
./contracts
./contracts/Migrations.sol
./truffle-config.js
Sweet! as they say. You will once again be modifying
truffle-config.js (changing the compiler and network port--see
STEP 8 of Lab 4 if you've forgotten) and will concentrate on the
the new migrations and contracts in the remainder of this
section of the lab.
STEP
3:
Add the starter file SimpleMath.sol to your contracts
directory, and add the starter file 2_contracts_migration.js
to your migrations directory. The SimpleMath.sol file
contains starter code for a simple calculator (it only adds at
the moment...you'll soon fix that). The
2_contracts_migration.js file provides the migration
instructions for the SimpleMath contract.
STEP
4:
To start testing, let's use truffle to get us started. In
your MPCSTesting directory, use truffle to create a test:
$
truffle test SimpleMath
Notice
that after running, you've got a new javascript test in your
workspace under test:
Right
out the gate, we can run our brand new base test. In VS
Code's terminal window (you should be in the MPCSTesting
directory), run the command:
$
truffle test
Using network 'development'.
Compiling your contracts...
===========================
> Compiling ./contracts/SimpleMath.sol
> Compilation warnings encountered:
project:/contracts/SimpleMath.sol:17:5: Warning: Function state
mutability can be restricted to pure
function add(uint _i1, uint _i2)
public view returns (uint sum) {
^ (Relevant source part starts here
and spans across multiple lines).
> Artifacts written to
/var/folders/mt/2wzh5nb144g44l496xrdkf3r0000gn/T/test--3221-Z3iDK5SBpqhu
> Compiled successfully using:
- solc:
0.5.16+commit.9c3226ce.Emscripten.clang
Contract: SimpleMath
✔ should
assert true
1 passing (60ms)
What you are looking for is that very happy "1 passing" summary in green.
Green is good. Red is bad.
Now,
let's add a new test (add this code to the simple_math.js file):
contract("SimpleMath
add", () => {
describe("add(2,2)", () => {
it("the sum should be correct", async () => {
// Try to add 2 + 2 and make
sure it equals 4
const mathtest = await
SimpleMath.deployed();
const expected = 4;
const result = await
mathtest.add(2,2);
assert.equal(result, expected,
"add method should return 4");
});
});
Now,
let's run the tests again:
$ truffle test
Using network 'development'.
Compiling your contracts...
===========================
> Everything is up to date, there is nothing to
compile.
Contract: SimpleMath
✔ should assert true
Contract: SimpleMath add
add(2,2)
✔
the sum should be correct
2 passing (96ms)
Everything looks good. Now, let's break our
test. In simple_math.js file, change the line that
reads:
const expected = 4;
to read:
const
expected = 0;
Now
of course we know that 2 + 2 != 0. So our test should
fail. Save the file, and rerun the tests (we don't need to
redeploy our contracts because only the javascript test has
changed, not our contracts):
$ truffle test
Using network 'development'.
Compiling your contracts...
===========================
> Everything is up to date, there is nothing to
compile.
Contract: SimpleMath
✔ should assert true
Contract: SimpleMath add
add(2,2)
1) the sum should be correct
> No events were emitted
1 passing (101ms)
1 failing
1) Contract: SimpleMath add
add(2,2)
the sum
should be correct:
AssertionError:
add method should return 4: expected <BN: 4> to equal 0
at
Context.<anonymous> (test/simple_math.js:22:14)
at
processTicksAndRejections
(node:internal/process/task_queues:95:5)
This
looks very good. We see red, which is what we'd expect,
because 2 +2 == 4 and not 0. Let's change that const
expected value back to 4 and rerun the tests:
$
truffle test
Using network 'development'.
Compiling your contracts...
===========================
> Everything is up to date, there is nothing to
compile.
Contract: SimpleMath
✔
should assert true
Contract: SimpleMath add
add(2,2)
✔ the sum should be correct
2 passing
(86ms)
Oh
Happy Day! We see green again.
STEP
5:
Now, we
need to create a new test to test for a boundary
situation. Add the following code to your test (at the
bottom of the file):
contract("SimpleMath
add", () => {
describe("add(UINT_MAX,1)", () => {
it("the sum should never overflow UNIT256",
async () => {
try {
// Try to add 2 + 2
and make sure it equals 4
const mathtest =
await SimpleMath.deployed();
//const expected =
4;
const result =
await mathtest.add(UINT_MAX, 1);
assert.ok(false,
'Threw an exception instead of overflowing');
} catch( ohoh ) {
assert.ok(true,
"Caught the exception")
}
})
})
});
Now,
save the test file and rerun the tests:
$
truffle test
Using network 'development'.
Compiling your contracts...
===========================
> Compiling ./contracts/SimpleMath.sol
> Artifacts written to
/var/folders/mt/2wzh5nb144g44l496xrdkf3r0000gn/T/test--9352-tpvYPNZtMlZi
> Compiled successfully using:
- solc:
0.5.16+commit.9c3226ce.Emscripten.clang
Contract: SimpleMath
✔ should
assert true
Contract: SimpleMath add
add(2,2)
✔
the sum should be correct
Contract: SimpleMath add
add(INT_MAX,1)
✔
the sum should never overflow UNIT256
3 passing (124ms)
Well, that should get you started.
STEP
6:
Now,
for you to do a little more work. Your first job is to add
to the SimpleMath contract additional new functions for
subtraction, multiplication, and division. You are also to
add numerous new tests to hammer add(), subtract(), multiply()
and divide().
Your
tests should test for the following error conditions:
1.
Overflows (numeric exceptions)
2. Underflows (numeric exceptions)
3. Valid return values (like 2 + 2 == 4 and nothing else,
etc.)
4. Boundary conditions (see the require(sum >=
_i1); line in SimpleMath.sol)
Problem
2: Cryptocurrency and Mining:
BACKGROUND:
WHAT YOU NEED TO DO:
STEP 1:
You may have noticed that in the last lab, the blockchain
magically got created by just adding new transactions. We
are going to modify that in this lab, to make it a tad bit more
realistic.
First,
you will need to think up a name for your new cryptocurrency you
will be mining on your blockchain. You can't call it
bitcoin or ether or any other existent cryptocurrency.
Barring that, there are no rules. You could call it
"Barbaracoin" or "Yapstone" or "Foolsgold" or "Capnjack" or
whatever you'd like. You will create a Miner class (see
below). Your Miner will take newly-created transactions
and collect transactions into blocks. Each new block will
include a "coinbase" transaction that creates "Barbaracoins" (or
whatever). The naming of your cryptocurrency is entirely
up to you. Have fun.
Your
cryptocurrency should be denominated in fractional form (similar
to satoshis in bitcoin), and we will keep it
simple: you will need to denominate your cryptocurrency in
1/1000s (milli-coins). So, as an example, 1 "Barbarinsky"
is 10-3, or 0.001, "Barbaracoins". You get the
idea. You will use the fractional form when designating
the Value of an Output (see below).
You are
to create a new class/structure called TxnMemoryPool, which can
of any type you wish, but a simple list of Transaction
objects/structures will do (order is unimportant), and this will
store your transactions in memory during processing. Note
you will no longer be automatically adding transactions to
blocks on creation of the transactions. Rather, you will
add them to the TxnMemoryPool on creation. This will simulate
receiving them from the network.
If you
plan to use multiple threads, you should set up a method or
function that creates a new unique transaction every 1-10
seconds (if using threads, you can make this decision as you
progress through your testing) and adds each new transaction to
the TxnMemoryPool. If you plan not to use multiple
threads, you may simply pre-create 91 new transactions and add
them to your TxnMemoryPool before beginning mining,
which may prove easier. You should modify your blockchain
code code there is a new MAX_TXNS field, which is the maximum
number of transactions per block. You should set this to
10 (including the coinbase transaction). So 9 transactions
+ 1 coinbase transaction = 10 Max.
If
you're wondering what in the world will go in your inputs and
outputs, you might remember that even a SHA-256 hash of a single
character, such as 'a', will always result in a 256-bit,
32-byte hash, every time, ad infinitum. This means
that you could simply stuff a hash of the current
timestamp+some_randomly_generated_number into the inputs, and no
one will be the wiser. Again, we are not concerning
ourselves at this point with "connecting-up" the outputs to the
inputs. Now, speaking of outputs, it's time now to create
a more formal definition of an output: an Output
class/structure. Let's make our new Output look like this:
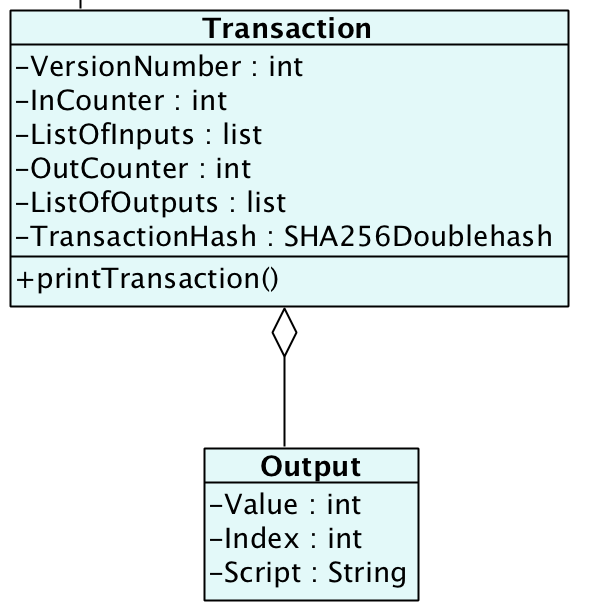
Note
that it is up to you to determine the best "decimal" format for
your particular language. That may be a Decimal object
(serialized), or an int (knowing that any Value is denominated
in 1/1000s of your currency), etc. That's your call.
So if you placed a "1500" in your Value, that would mean 1.5
"Barbaracoins" (or "CapnJacks", etc.). At this point, you
can put anything you want in the string Script. See above
conversation on inputs.
STEP
2:
You will create a new Miner class/function, that will go through
the TxnMemoryPool (which will eventually be growing at a steady
rate), and your Miner will attempt to create a block whose
Blockhash is less than the target you will set. In this
lab, our target will be calculated as:
Target = coefficient
* 2(0x8 * (exponent – 0x3))
Your Header.Bits (for all blocks) will default to 0x207fffff, with is the
difficulty bits for Regtest. This means that your coefficient
will be '0x7fffff' and your exponent will be
'0x20'. Note that this is just a starting default.
It's designed to make mining a slight challenge but
nothing you're going to spend eternity waiting on (on
average...your mileage may vary...). Feel free to adjust
your bits in order to play around with different levels of
difficulty if you get bored. In our case for this lab, you
will not need to worry about automatically adjusting the mining
difficulty. For example, for a little more challenge, you
could try the difficulty bits value used on Testnet:
0x1d00ffff. When you are done experimenting, you will want
to reset your Header.Bits to the default of 0x207fffff for final submission.
As
you build your candidate blocks, keep in mind you will need a
coinbase transaction as the first transaction in each of the
blocks. This coinbase transaction will create an amount of
your cryptocurrency that is also up to you. You could
follow the bitcoin model and start out with 50 bitcoins, or you
could be more or less generous. That's entirely up to you.
Hopefully
you adequately encapsulated the creation of the genesis block in
your blockchain.
Beyond
this, nothing much changes from Lab 5. And as usual,
unless specified, everything else is up to you.
STEP
3:
You are to write a test case (can be a simple main function or
an actual test harness from a framework) in which you run your
new Blockchain mining. You will create a new Blockchain
and by doing so you will create your genesis block. After
mining the transactions in the TxnMemoryPool, print out the
block height of the tip of the chain.
Submit all code and related files (if any) as specified below.
Finally, and importantly, you are of course free, and
encouraged, to look at the actual bitcoin source code for
mining. But remember, your submission had best not closely
resemble any of that source in such a way that it would indicate
direct copying.
You may find the following references helpful (in addition to the links from previous labs):
Truffle
Suite javascript
testing
Testing contracts using
Truffle
Mocha testing introduction
Writing tests
in Solidity
Use Truffle
Develop and the Console
You may find the following references helpful (in addition to the links from previous labs):
The
Bitcoinwiki Article
on Target
The Bitcoinwiki
on Difficulty
Bit-Ish Data Article on Building a Blockchain: Difficulty
Explained
freeCodeCamp Article
on Mining
The Bitcoinwiki
Page on Block Hashing Algorithm
The Bitcoinwiki
Page on Transactions
The Bitcoinwiki
Page on Raw Transactions
The Bitcoinwiki
Page on Blocks
Sample
program that mines
Bitcoin Developer Reference on Target
Stack Exchange conversation
on mining
Each assignment will have an invitation to create a Github repository. You will use the lab[1-7]-YOUR_GITHUB_USERID to submit your homework.