Q-Learning Project
Project Material
- Objectives
- Deliverables
- Deadlines & Submission
- The Q Learning Project Description
- Learning Task
- Q-Learning Algorithm
- ROS Topics & Messages
- Setting Up the Q-matrix and the Action Matrix
- Q-Matrix Convergence
- Iterating through the Q-Learning Algorithm
- Saving the Q-Matrix & Communicating It to the Next Phase
- Robot Actions: Picking Up Colored Objects and Placing them in Front of AR Tags
- The Big Picture
Objectives
Your goal in this project is to implement a Q-Learning algorithm to give your robot the ability to learn how to organize items in its environment using reinforcement learning. This project will also involve components of both 1) perception - to detect the items to organize and the locations for drop-off and 2) control - to make the robot arm pick up the items and then navigate to the locations where they are to be dropped off. Like before, If you have any questions about this project or find yourself getting stuck, please post on the course Slack or send a Slack DM to the teaching team. Even if you don't find yourself hitting roadblocks, feel free to share with your peers what's working well for you.
Learning Goals
Teaming & Logistics
You are expected to work with 1 other student for this project, who is different than your particle filter project partner. If you strongly prefer working by yourself, please reach out to the teaching team to discuss your individual case. A team of 3 will only be allowed if there is an odd number of students. Your team will submit your code and writeup together (in 1 Github repo).
If you are looking for a partner, send a Slack message in the channel #find-project-partner.
For questions please post them in the #q-learning-project channel.
Deliverables
Like before, you'll submit this project on Github (both the code and the writeup). Have one team member fork our starter git repo to get our starter code and so that we can track your project. Both of your team members will contribute code to this one forked repo.
Implementation Plan
Please put your implementation plan within your README.md file. Your implementation plan should contain the following:
- The names of your team members
-
A 1-2 sentence description of how your team plans to implement each of the following components of this project as well as a 1-2 sentence description of how you will test each component:
-
Q-learning algorithm
- Executing the Q-learning algorithm
- Determining when the Q-matrix has converged
- Once the Q-matrix has converged, how to determine which actions the robot should take to maximize expected reward
-
Robot perception
- Determining the identities and locations of the three colored objects
- Determining the identities and locations of the three AR tags
-
Robot manipulation & movement
- Picking up and putting down the colored objects with the OpenMANIPULATOR arm
- Navigating to the appropriate locations to pick up and put down the colored objects
-
Q-learning algorithm
- A brief timeline sketching out when you would like to have accomplished each of the components listed above.
Writeup
Modify the README.md file as your writeup for this project. Please add pictures, Youtube videos, and/or embedded animated gifs to showcase and describe your work. Your writeup should contain the sections listed below. For the Q-Matrix intermediate deliverable, you should have the (1) objectives description, (2) high-level description, and (3) Q-learning algorithm description complete. All other sections will be due when the entire Q-learning project is due.
- Objectives description (2-3 sentences): Describe the goal of this project.
- High-level description (1 paragraph): At a high-level, describe how you used reinforcement learning to solve the task of determining which colored objects belong in front of each AR tag.
- Q-learning algorithm description: Describe how you accomplished each of the following components of the Q-learning algorithm in 1-3 sentences, and also describe what functions / sections of the code executed each of these components (1-3 sentences per function / portion of code):
- Selecting and executing actions for the robot (or phantom robot) to take
- Updating the Q-matrix
- Determining when to stop iterating through the Q-learning algorithm
- Executing the path most likely to lead to receiving a reward after the Q-matrix has converged on the simulated Turtlebot3 robot
- Robot perception description: Describe how you accomplished each of the following components of the perception elements of this project in 1-3 sentences, any online sources of information/code that helped you to recognize the objects, and also describe what functions / sections of the code executed each of these components (1-3 sentences per function / portion of code):
- Identifying the locations and identities of each of the colored objects
- Identifying the locations and identities of each of the AR tags
- Robot manipulation and movement: Describe how you accomplished each of the following components of the robot manipulation and movement elements of this project in 1-3 sentences, and also describe what functions / sections of the code executed each of these components (1-3 sentences per function / portion of code):
- Moving to the right spot in order to pick up a colored object
- Picking up the colored object
- Moving to the desired destination (AR tag) with the colored object
- Putting the colored object back down at the desired destination
- Challenges (1 paragraph): Describe the challenges you faced and how you overcame them.
- Future work (1 paragraph): If you had more time, how would you improve your implementation?
- Takeaways (at least 2 bullet points with 2-3 sentences per bullet point): What are your key takeaways from this project that would help you/others in future robot programming assignments working in pairs? For each takeaway, provide a few sentences of elaboration.
Code
The code that you develop for this project should be in new Python ROS nodes that you create within the scripts folder and the two empty training.launch action.launch launch files within the launch folder. Besides the /scripts/q_learning.py file, DO NOT EDIT ANY OTHER SCRIPTS OR MESSAGE FILES WE PROVIDE IN THE STARTER GIT REPO (e.g., scripts/reset_world.py, scripts/phantom_robot_movement.py, any of the custom message files in the /msg
directory). If you wish to create additional launch files or additional custom ROS messages, you're welcome to do that. We just ask that you don't edit the launch files, ROS nodes, and custom messages that we've provided in the starter code.
training.launch should have node(s) that:
- Run
virtual_reset_world.py - Run any scripts you've written to train and save the matrix e.g.
q_learning.py
action.launch should have node(s) that:
- Run any scripts you've written to load the saved QMatrix, and dispatch actions as needed to put the right colored objects to each tag
- Run any scripts you've written to receive dispatched actions and carry them out e.g. tag perception, colored object pickup etc.
Note that action.launch should run on top of turtlebot3_intro_robo_manipulation.launch
gif
In your writeup, include a gif of your robot successfully executing the task once your Q-matrix has converged.
rosbag
Record a run of your q-learning algorithm during training in a rosbag. Please record the following topics: /cmd_vel, /gazebo/set_model_state, /q_learning/q_matrix, /q_learning/reward, /q_learning/robot_action, /scan, and any other topics you generate and use in your particle filter project. Please do not record all of the topics, since the camera topics make the rosbags very large. For ease of use, here's how to record a rosbag:
$ rosbag record -O filename.bag topic-namesPartner Contributions Survey
The final deliverable is ensuring that each team member completes the Partner Contributions Google Survey. The purpose of this survey is to accurately capture the contributions of each partner to your combined q-learning project deliverables.
Grading
The Partile Filter Project will be graded as follows:
- 5% Implementation Plan
-
23% Writeup
- 8% Objectives, High-level description, & gif
- 12% Main steps
- 3% Challenges, Future Work, Takeaways
- 2% ROS Bag Recording
- 10% Individual Contribution and Teaming
- 60% Code
- 30% Q-Learning
- 4% Properly utilizing state and action matrices
- 10% Executing the Q-learning algorithm
- 6% Launchfiles + saving the Q-matrix file
- 6% Q-learning convergence
- 4% Executing the correct sequence of actions once the Q-matrix has converged
- 30% Movement & Perception
- 4% Identification of the colored tubes
- 4% Identification of the AR tags
- 10% Picking up & putting down the colored tubes
- 6% Moving to the right spot to pick up the colored tubes
- 6% Moving to the right spot to put down the colored tubes
- 30% Q-Learning
Deadlines & Submission
- Wednesday, April 27 11:00am CST - Implementation Plan
- Tuesday, May 3 11:00am CST - Q-Matrix (intermediate deliverable)
- Writeup (see section above for more details on each of the following sub-sections): objectives description, high-level description, Q-learning algorithm description
- Code: we expect that running your
training.launchfile generates a converged Q-matrix that is stored in a.csvfile
- Tuesday, May 10 11:00am CST - Everything: Code, Writeup, gif, rosbag, Partner Contributions Survey
Submission
As was true with the prior projects, we will consider your latest commit before 11:00 AM CST as your submission for each deadline. If you want to use any of your flex late hours for this assignment, please send a group DM on Slack to all teaching stuff (so we know to clone your code at the appropriate commit for grading).
Your Objective
Your goal in this project is to computationally determine what actions the robot should take in order to achieve the goal state (where each colored object is placed in front of the correct AR tag) using reinforcement learning. Conceptually, your program will be in either of two phases:
- Training: During this phase, you will be ONLY training your Q-matrix via reinforcement learning. This Phase will stop once you have determined your Q-matrix has converged.
- Action: In this phase, you will use your converged Q-matrix to guide the robot towards the goal state. Your robot will have to pick up, move, and place each colored item in accordance with the learned goal state.
To launch the Gazebo world for this project, run:
$ roslaunch q_learning_project turtlebot3_intro_robo_manipulation.launch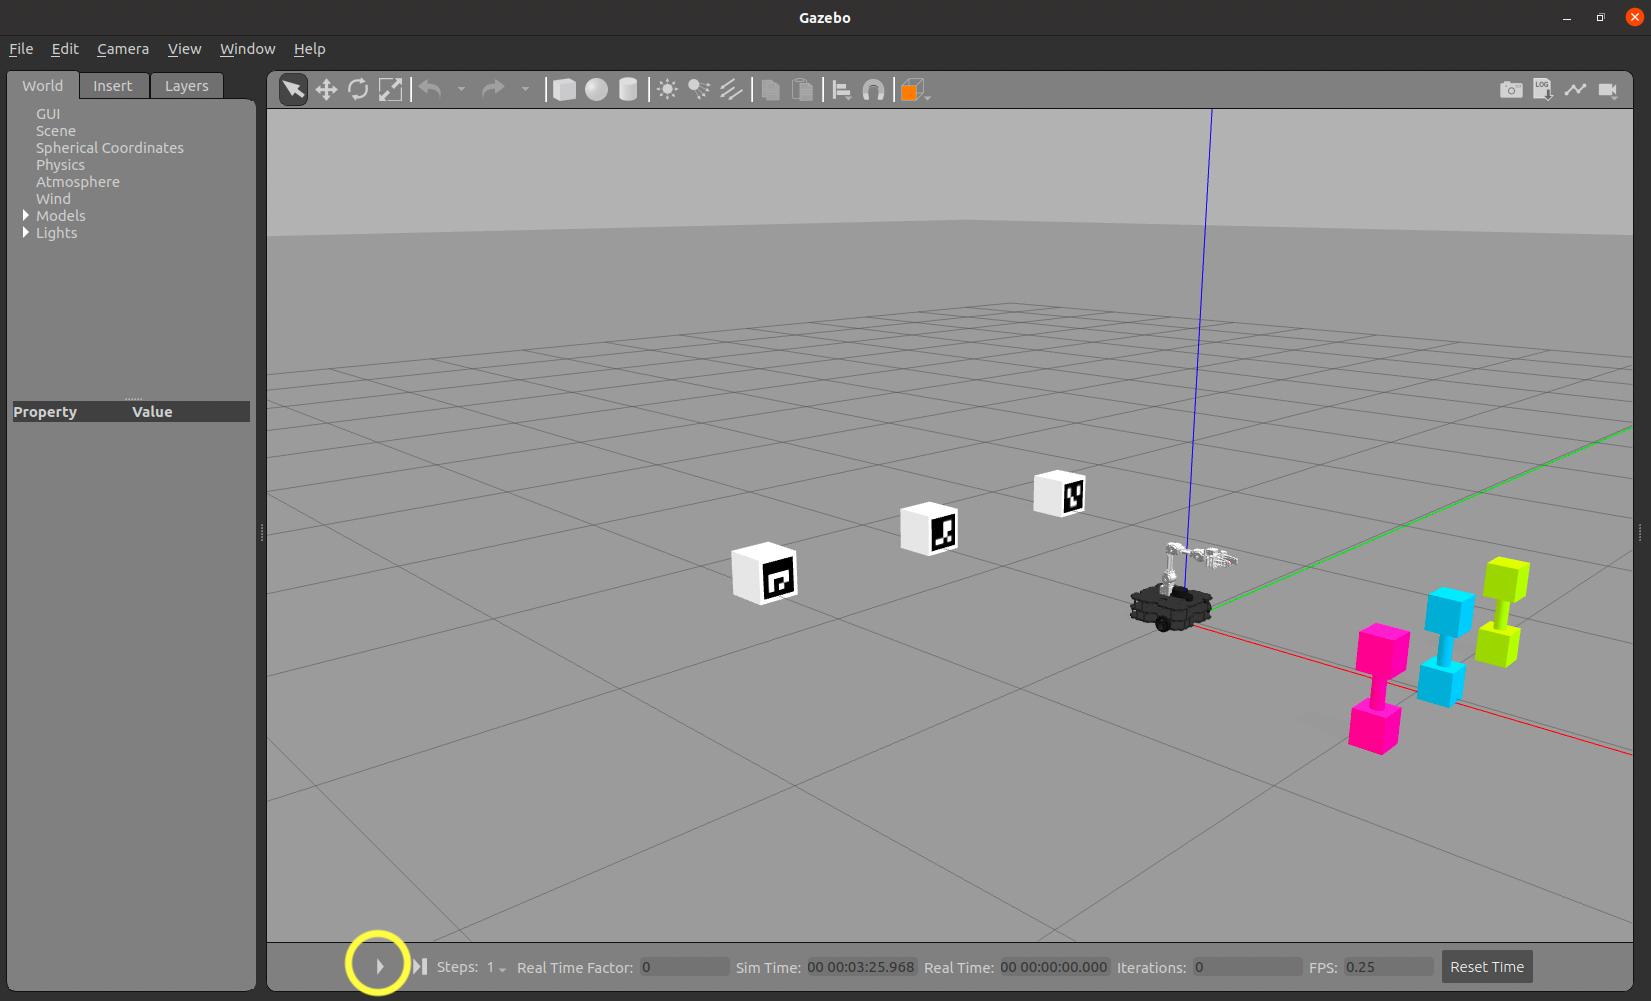
One important feature to make you aware of is that this Gazebo world file is launched with the parameter paused set to true (turtlebot3_intro_robo_manipulation.launch lines 4 and 12). Whenever you want to start running, you'll need to press the play button the bottom left hand corner of your Gazebo window (circled in light blue in the picture above).
Learning Task
As we mentioned above, your goal in this project is to computationally determine what actions the robot should take in order to achieve the goal state (where each colored object is placed in front of the correct AR tag) using reinforcement learning, and specifically, Q-learning. You will implement your Q-learning algorithm in new ROS node(s) that you'll compose in new Python file(s) within the /scripts directory. Once you have all of your appropriate nodes working, fill in the training.launch file so that it launches all of your nodes and trains the q-matrix with one roslaunch command. Your Q-learning algorithm should proceed as follows:
Q-Learning Algorithm
\(\textrm{Algorithm Q_Learning}:\)
\( \qquad \textrm{initialize} \: Q \)
\( \qquad t = 0 \)
\( \qquad \textrm{while} \: Q \: \textrm{has not converged:} \)
\( \qquad \qquad \textrm{select} \: a_t \: \textrm{at random} \)
\( \qquad \qquad \textrm{perform} \: a_t \)
\( \qquad \qquad \textrm{receive} \: r_t \)
\( \qquad \qquad Q(s_t, a_t) \leftarrow Q(s_t, a_t) + \alpha \cdot \Big( r_t + \gamma \cdot \: \textrm{max}_a Q(s_{t+1}, a) - Q(s_t, a_t) \Big)\)
\( \qquad \qquad t = t + 1\)
Where:
- \(Q: S \times A \rightarrow \mathbb{R} \), meaning that for a given state \( (s_t) \) and action \( (a_t) \), \(Q(s_t, a_t)\) is a real number \((\mathbb{R})\)
- \(s_t \in S\) represents the state space - all possible states of the world
- \(a_t \in A\) represents the action space - all possible actions the robot could take
- \(r_t \) is the reward received when action \(a_t\) is taken from state \(s_t\) according to the reward function \(r(s_t, a_t)\)
- \(\alpha\) represents the learning rate \((0 \le \alpha \le 1) \), the closer to 1 the learning rate is, the more rapidly your Q-matrix will update to observed rewards; for this project it is recommended that you start out with \( \alpha = 1\), if you want to experiment with the learning rate, we'd recommend doing that only after have a fully working Q-learning algorithm with \( \alpha = 1\)
- \(\gamma\) is the discount factor where \((0 \le \gamma \le 1) \), which indicates how much future rewards are considered in the actions of a system, \(\gamma = 0\) would indicate a scenario in which a robot only cares about the rewards it could get in a single moment, as where \(\gamma = 1\) indicates a scenario where the robot doesn't care at all about the short term and pursues whatever actions will produce the best long-term reward (regardless of how long that takes), for this project, we recommend choosing a value for \(\gamma\) somewhere in between 0 and 1
ROS Topics & Messages
You will need to publish and subscribe to several ROS topics to complete your Q-learning task:
| ROS Topic | ROS msg Type | Notes |
/q_learning/q_matrix |
q_learning/QMatrix |
Each time you update your Q-matrix in your Q-learning algorithm, publish your Q-matrix to this topic. |
/q_learning/reward |
q_learning/QLearningReward |
You will subscribe to this topic to receive from the environment the reward after each action you take. |
/q_learning/robot_action |
q_learning/RobotMoveObjectToTag |
Every time you want to execute an action, publish a message to this topic (this is the same topic you'll be subscribing to in the node you write to have your robot execute the actions). |
Setting Up the Q-matrix and the Action Matrix
For this project, we will represent \(Q\) as a matrix, where the rows correspond with the possible world states \(s_t\) and the columns represent actions the robot can take \(a_t\). The actions that the robot can possibly take is available through self.actions in q_learning.py of the starter code. It is organized as follows:
| action number (column) | move object | to tag ID |
| 0 | pink | 1 |
| 1 | pink | 2 |
| 2 | pink | 3 |
| 3 | green | 1 |
| 4 | green | 2 |
| 5 | green | 3 |
| 6 | blue | 1 |
| 7 | blue | 2 |
| 8 | blue | 3 |
There are 64 total states for the system to be in, which is also available to you in self.states within q_learning.py:
| state number (row) | pink object location | green object location | blue object location |
| 0 | origin | origin | origin |
| 1 | tag 1 | origin | origin |
| 2 | tag 2 | origin | origin |
| 3 | tag 3 | origin | origin |
| 4 | origin | tag 1 | origin |
| 5 | tag 1 | tag 1 | origin |
| 6 | tag 2 | tag 1 | origin |
| 7 | tag 3 | tag 1 | origin |
| 8 | origin | tag 2 | origin |
| 9 | tag 1 | tag 2 | origin |
| 10 | tag 2 | tag 2 | origin |
| 11 | tag 3 | tag 2 | origin |
| 12 | origin | tag 3 | origin |
| 13 | tag 1 | tag 3 | origin |
| 14 | tag 2 | tag 3 | origin |
| 15 | tag 3 | tag 3 | origin |
| ... | ... | ... | ... |
| 63 | tag 3 | tag 3 | tag 3 |
Where
- states 16 - 31 repeat states 0-15, except with the blue object location at tag 1,
- states 32 - 47 repeat states 0-15 except with the blue object location at tag 2, and
- states 48 - 63 repeat states 0-15 except with the blue object location at tag 3.
In addition to a Q-matrix, we have provided you with an action matrix, available through self.action_matrix in q_learning.py. The rows of the action matrix represents a starting state \((s_t)\) and the columns of the action matrix represents the next state \((s_{t+1})\). The matrix is set up such that \(\textrm{action_matrix}[s_t][s_{t+1}] = a_t \). Let's examine the example of \(\textrm{action_matrix}[0][12] = 5 \). In this case \(s_t = 0\), where all three colored objects are at the origin, and \(s_{t+1} = 12\), where the pink and blue objects are at the origin and the green object is at tag 3, and \(a_t = 5\) which is the action corresponding with the robot taking the green object to tag 3.
All transitions from \(s_t\) to \(s_{t+1}\) that are impossible or invalid are assigned a value of -1. For example, since the robot can only carry one colored object at a time, the transition from state 0 to 6 is impossible. Additionally, only one object can sit in front of one AR tag at a time, so any transition to state 5 (where both the pink and green objects are at tag 1) is also impossible and is assigned the value -1.
The value of having this action matrix comes into play when we're executing the \( \textrm{select} \: a_t \: \textrm{at random} \) step of the Q-learning algorithm. In order to select a random action, we take our current state \((s_t)\), and look up the row corresponding with that state in the action matrix. All the values that are not -1 represent valid actions that the robot can take from state \(s_t\). You can then pick one of these at random.
Q-Matrix Convergence
As highlighted in the Q-learning algorithm, you will iterate through the while loop, updating your Q-matrix, until your Q-matrix has converged. What we mean by "convergence" in this context is that your Q-matrix has reached its final form and no more updates or changes will occur to it. It's up to you to determine how to ascertain when your Q-matrix has converged.
Iterating through the Q-Learning Algorithm
In order to reach convergence of your Q-matrix, you're going to have to run many iterations of having the robot place the colored objects in front of the AR tags and debug your code frequently. To make debugging easier, we've created two different nodes to help you with that:
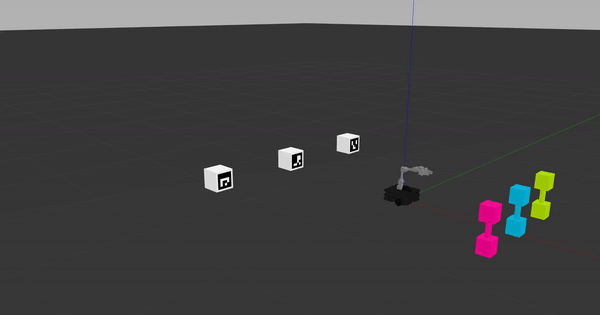
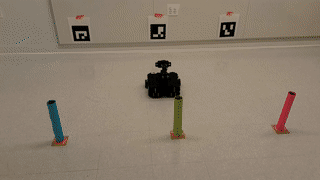
- a "phantom robot movement" node that moves the colored objects as if a "phantom robot" were doing it (see gif below), run with:
$ rosrun q_learning_project phantom_robot_movement.py - a "virtual reset world" node that will let you quickly iterate through the Q-learning algorithm until you reach convergence, run with:
$ rosrun q_learning_project virtual_reset_world.py
The phantom robot movement ROS node subscribes to robot actions given on the /q_learning/robot_action ROS topic, so as long as you're sending robot actions on this topic and have the phantom robot movement node running, you should see something like what's pictured in the following gif.
This phantom robot movement node is designed to help you debug your learning code. Once you have ensured that your code works properly, you'll need to shut down the phantom robot movement ROS node and use the "virtual reset world" node that will let you quickly iterate through the Q-learning algorithm until you reach convergence.
The virtual reset world works by responding to robot actions given on the /q_learning/robot_action ROS topic and publishes rewards to the /q_learning/reward topic based on the actions it receives without manipulating the gazebo world, hence it is faster. If you are operating it correctly, you should see an output like the following:
robot_object: "blue"
tag_id: 3
Published reward:  0
robot_object: "pink"
tag_id: 2
Published reward:  0
robot_object: "green"
tag_id: 1
Published reward:  0
reseting the world
robot_object: "blue"
tag_id: 3
Published reward:  0
robot_object: "pink"
tag_id: 1
Published reward:  0
robot_object: "green"
tag_id: 2
Published reward:  0
reseting the world
Tips:
- We recommend that you use the phantom robot movement node for visual debugging (making sure that you're sending
/q_learning/robot_actionmessages properly) and that you use the virtual reset world node for RL training - converging your Q matrix over many iterations. - You should not be using the phantom robot movement node for fully training your Q-matrix (which can take upto 10-15 mins for a full training). Use the virtual reset world instead.
- To use the phantom robot movement node, you will need to launch Gazebo in the world provided by us. The virtual reset node can be run without gazebo.
- The reset world node has a bug where it sometimes reports two rewards for certain actions. If you are using the phantom robot movement node for debugging, keep an eye out for these duplicate rewards.
Saving the Q-Matrix & Communicating It to the Next Phase
Training the Q-matrix will often take some time and communicating this matrix to the next phase of operations could lead to issues. Hence, we ask you to save your Q-matrix in an appropriate file (e.g. csv) once it has converged. The action phase of this project will need to read/load the trained Q-matrix via this file.
Robot Actions: Picking Up Colored Objects and Placing them in Front of AR Tags
One key component to this project is building a ROS node that can execute actions published to the /q_learning/robot_action ROS topic (with a custom message type of q_learning/RobotMoveObjectToTag). When your ROS node receives a message on this topic, it should:
- Move to and pick up the colored object specified by the
robot_objectattribute of the q_learning/RobotMoveObjectToTag message - Carry the colored object to the tag specified by the
tag_idattribute of the q_learning/RobotMoveObjectToTag message, and - Put the colored object down.
Write your code for this node in new Python file(s) within the /scripts directory. Once you have all of your appropriate nodes working, fill in the action.launch file so that it launches all of your nodes and executes appropriate actions based on the learned Q-Matrix. The following subsections will give you some more details and helpful tips on the perception and robot manipulator control components to programming these robot actions.
Perception
In order to pick up the colored objects and carry them to the AR tags, your robot will need to be able to perceive:
- Each of the three colored objects and their locations, and
- Each of the three AR tags and their locations
$ rosrun image_transport republish compressed in:=raspicam_node/image raw out:=camera/rgb/image_rawTo launch the Turtlebot3 RViz window, run:
$ roslaunch turtlebot3_gazebo turtlebot3_gazebo_rviz.launch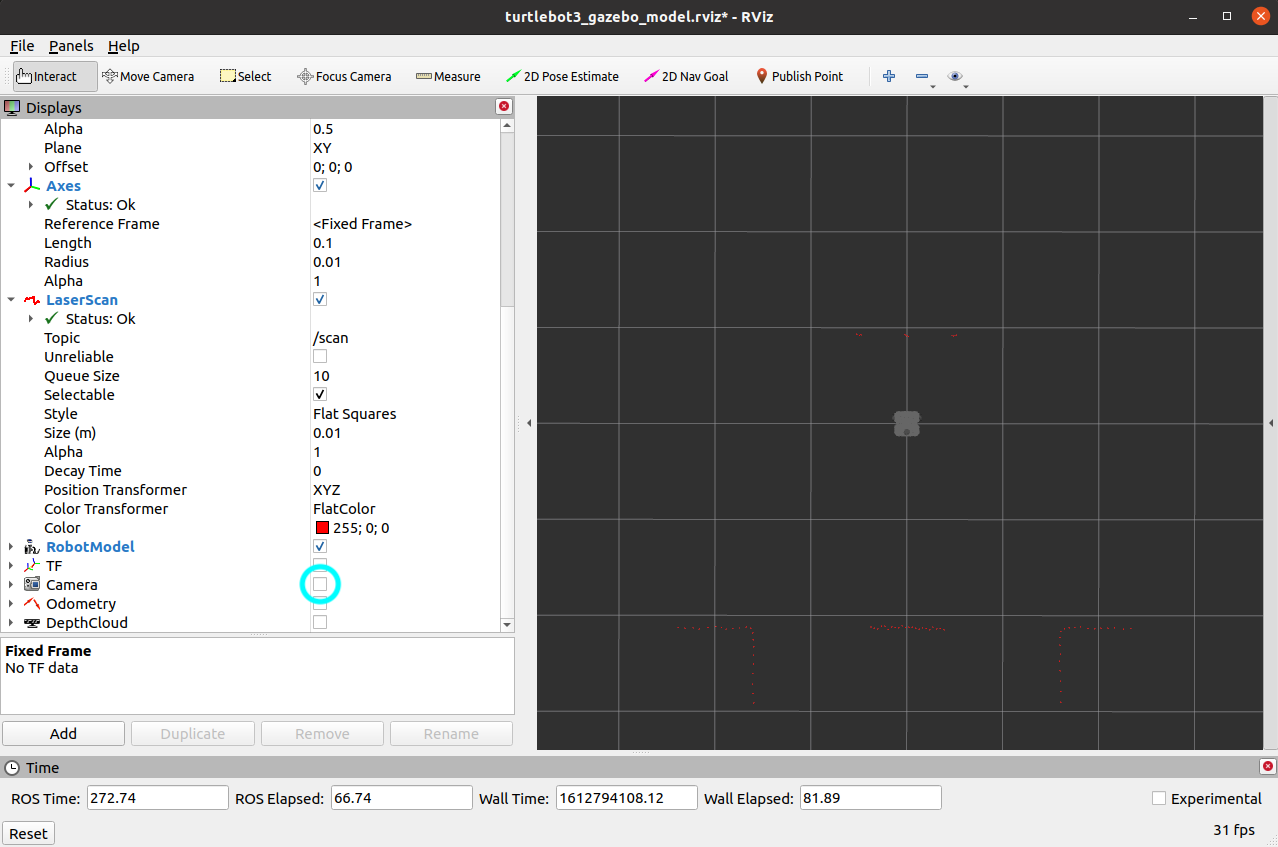
One important thing to note is that you can visualize what the robot sees through its RGB camera by checking the check box next to "Camera" (see the image above). Once you do, you can see "through the eyes of the robot".
You'll likely want to use a combination of the /scan and /camera/rgb/image_raw ROS topics to identify and locate the objects in the environment. For the detection of the colored objects, you're more than welcome to leverage the code that we used for the line follower in Lab B.
AR Tag Recognition
The AR tags you will be identifying in this exercise come from the ArUco library, which is implemented in OpenCV as its aruco module. ArUco markers come in sets known as dictionaries, which are defined by the size of the markers and the number of markers in the set. In particular, the three tags we are using are tags 1, 2, and 3 from the dictionary DICT_4X4_50 (a set of 50 4x4 markers).
To use the cv2.aruco module, you need to first install it via
$ pip install opencv-contrib-python$ sudo apt install python3-pipNext, you need to load the dictionary in your Python script.
import cv2

# load DICT_4X4_50
aruco_dict = cv2.aruco.Dictionary_get(cv2.aruco.DICT_4X4_50)

.
.
.

# search for tags from DICT_4X4_50 in a GRAYSCALE image
corners, ids, rejected_points = cv2.aruco.detectMarkers(grayscale_image, aruco_dict)

# corners is a 4D array of shape (n, 1, 4, 2), where n is the number of tags detected
# each entry is a set of four (x, y) pixel coordinates corresponding to the
# location of a tag's corners in the image

# ids is a 2D array array of shape (n, 1)
# each entry is the id of a detected tag in the same order as in corners

# rejected_points contains points from detected tags that don't have codes matching the dictionary
For more information, please visit the documentation. Although the tutorial is written for C++, you can find headers for the equivalent Python functions under their respective function documentations.
Tips:
- Due to differences in camera angle and lighting, there may be frames where an ArUco marker is not detected despite being in view of the camera. Make sure to thoroughly test your algorithm on a real TurtleBot before submitting.
Robot Manipulator Control
In order to enable your robot to pick up the colored objects (dumbbells in Gazebo, paper towel tubes in real-life), you'll need to get familiar with programming the Turtlebot3's OpenMANIPULATOR arm. Here's a list of resources to help you get up and running:
- The our class's exercise from Lab F
- The Simulation section on the Manipulation page of the Turtlebot3 ROBOTIS e-Manaual
-
The MoveIt tutorials, and specifically the Python interface for MoveIt tutorial and the Python code referenced in that tutorial
- We encourage you to read through this Python code and apply what you learn to your implementation
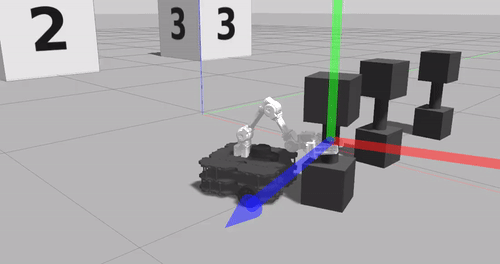
The following gif on the left shows an example of the Turtlebot3 OpenMANIPULATOR arm picking up a dumbbell in Gazebo. The gif on the right shows an example of the real-world Turtlebot3 with OpenMANIPULATOR moving to and picking up a colored tube.
Tips:
- Use GUIs discussed in Lab F to find the appropriate joint angles for picking up and putting down the colored objects.
- Do not squeeze the objects too much with your gripper.
Extracting Action Commands that Maximize Future Reward
Once your Q-matrix converges and has been saved to an appropriate file, you now have a Q-matrix that contains information about future expected reward for robot actions. You can now use the Q-matrix to make decisions about actions to take that will lead to the highest expected future reward. To do this, load your Q-matrix, take your current state \(s_t\) and look up the corresponding row in your Q-matrix. In this row, find the action (column) that corresponds with the highest Q-value. This is the action that will lead to the highest expected future reward.
The Big Picture
Once you have implemented everything that's outlined above, this is how your program should work:
- Launch
learning.launch. This should launch your training nodes along withvirtual_reset_world.pyand save a converged Q-matrix into a file. Make sure to let the user know once your matrix has converged. Once the Q-matrix has been saved in to a file, stop this command by pressingCtrl-C. - Launch
turtlebot3_intro_robo_manipulation.launch. - Launch
action.launch. This should launch ROS nodes that read in the saved Q-matrix and execute the robot action commands to pick up the colored objects and place them in front of the AR tags
Acknowledgments
The design of this course project was influenced by Brian Scassellati and his Intelligent Robotics course taught at Yale University. Also, I want to thank my sister, Rachel Strohkorb, for creating the custom dumbbell model for our use in the Gazebo simulator.