Each lab will consist of a small problem and details of how to proceed. You need to submit labs to the TAs for grading--see submission instructions below. Generally, unless otherwise specified, you will have one week to complete each assigned lab.
See the syllabus for information on grading. Turning in lab assignments is required. Submit your assignments using Subversion to the pre-existing repo folder for this lab. See the directions on the syllabus page for more information.
ALL
CODING in the remainder of the class will be in Java only.
Lab 5 Due: 5:00 pm, Tuesday, May 8, 2018
Problem
1 of 2
(Software Setup and Validation):
For this assignment you will make sure that your environment is set up for proper execution during the remainder of the class. This will involve making sure you have the following tools and running a test Eclipse project:
Java 1.8.xx
Apache ActiveMQ 5.15.3
Maven 3.5.3
Eclipse Neon (we do not recommend Eclipse Oxygen)
Apache Camel 2.10.3
Your
ultimate goal, and the submission for this problem, will be an
Eclipse
version of this Maven project.
Throughout
this setup, you will
verify that your development environment is sane and
functioning, then
you
will compile and execute the Maven project to make sure you can
build
the Camel code. You will then convert the Maven project to
an
Eclipse project, and then you will run and build the Eclipse
project
and execute the program, again verifying that the program (now
running
within Eclipse) executes successfully. When it all works
fine,
you will
submit the Eclipse project as decribed below. You
will not need to write or modify any code for this
problem. The code is
provided for
you. All you need to do is get it to compile and execute
from
within Eclipse.
Follow the steps below to install the Java JDK, Maven, ActiveMQ, and Eclipse. We will also copy (and a bit later on, compile) source code from the Camel in Action and ActiveMQ in Action books.
The sections below are formatted with an objective followed by instructions for Mac and Windows, respectively. If you have some variety of Linux, in most cases (but not all) you will be able to use the Mac instructions as-is.
---------------------
--- PREREQUISITES
---------------------

- Objective: Create directories that will be assumed to exist in subsequent steps.
- Mac OS X
    mkdir ~/mpcs.51050
- Windows
    mkdir c:\opt
    mkdir c:\mpcs.51050


---------------------
--- JDK 8 INSTALL
---------------------

- Objective: Install JDK 1.8 with JRE 1.8
    java  -version
    => 1.8.0_xxx
    javac -version
    => 1.8.0_xxx
    (If you already have JDK 1.7 that could also work.)
- Links
    http://www.oracle.com/technetwork/java/javase/downloads/jdk8-downloads-2133151.html
- Mac OS X
    Double-click dmg file and install
- Windows
    Windows installer recommended settings
    -- Install paths --
    c:\opt\java\jdk1.8.0_171           <== Initial prompt will be for JDK path.
    c:\opt\java\jre1.8.0_171           <== Second prompt is for JRE path.
    -- Environment variables (How-To) --
    PATH      => Append: c:\opt\java\jdk1.8.0_171\bin
    JAVA_HOME => Assign: c:\opt\java\jdk1.8.0_171


---------------------
--- MAVEN 3.5.3 INSTALL
---------------------

- Objective: Install mvn command line utility
    mvn --version
    => 3.5.3
- Links
    https://maven.apache.org/download.cgi
    http://download.nextag.com/apache/maven/maven-3/3.5.3/binaries/apache-maven-3.5.3-bin.zip
- Mac OS X
    -- Use brew - no need to manually download anything --
    brew install maven
    -- If brew is not present, run the following: --
    /usr/bin/ruby -e "$(curl -fsSL https://raw.githubusercontent.com/Homebrew/install/master/install)"
- Windows
    -- Unzip instead of running traditional installer --
    c:\opt\maven                            <== Extract archive and put files here.
    dir c:\opt\maven\bin\mvn                <== This file should exist; check your work.
    -- Environment variables (How-To) --
    PATH => Add  c:\opt\maven\bin to PATH environment variable.


---------------------
--- ACTIVEMQ 5.15.3 INSTALL
---------------------

- Objective: Install activemq server to run interactively from a command line window
- Links
    http://www.apache.org/dyn/closer.cgi?filename=/activemq/5.15.3/apache-activemq-5.15.3-bin.zip&action=download
    http://www.apache.org/dyn/closer.cgi?filename=/activemq/5.15.3/apache-activemq-5.15.3-bin.tar.gz&action=download
    http://activemq.apache.org/activemq-5153-release.html
- Mac OS X
    -- Unzip directory --
    ~/activemq                              <== Extract archive and put files here.
    ls ~/activemq/bin/activemq              <== This file should exist; check your work.
    -- Running activemq server --
    cd ~/activemq
    bin/activemq console                    <== Keep this window open while using ActiveMQ. Use Ctrl-C when done with ActiveMQ.
    -- Stopping activemq server --
    (Press Ctrl-C in the window where `bin/activemq console` was started.)
- Windows
    -- Unzip instead of running traditional installer --
    c:\opt\activemq                         <== Extract archive and put files here.
    dir c:\opt\activemq\bin\activemq.bat    <== This file should exist; check your work.
    -- Running activemq server --
    cd c:\opt\activemq\bin
    activemq start                          <== Keep this window open while using ActiveMQ. Use Ctrl-C when done with ActiveMQ.
    -- Stopping activemq server --
    (Press Ctrl-C in console window.)


---------------------
--- ECLIPSE NEON INSTALL
---------------------

- Objective: Install Eclipse NEON **NOT OXYGEN**
    - Select "Eclipse IDE for Java Developers"
- Links
    https://www.eclipse.org/downloads/packages/release/neon/3
    https://www.eclipse.org/neon/
- Mac OS X
    -- Unzip .tar file --
    -- Drag Eclipse.app to "Applications"
- Windows
    -- Unzip instead of running traditional installer --
    c:\opt\eclipse                          <== Extract archive and put files here.
    dir c:\opt\eclipse\eclipse.exe          <== This file should exist; check your work.
    -- Environment variables --
    (No environment variables needed, but ensure JAVA_HOME was set correctly above.)
    -- Misc --
    Create a Windows "shortcut" to c:\opt\eclipse\eclipse.exe and put it on your desktop, start menu, etc., as desired.


---------------------
--- BOOK SOURCE CODE - CAMEL IN ACTION AND ACTIVEMQ IN ACTION
---------------------

- Links
    https://www.classes.cs.uchicago.edu/archive/2018/spring/51050-1/LABS/AMQinA-src.zip
    https://www.classes.cs.uchicago.edu/archive/2018/spring/51050-1/LABS/camelinaction-source-2122.zip
 - Mac OS X
    -- ActiveMQ in Action unzip directory
    ~/mpcs.51050/amq-in-action-example-src
    -- Camel in Action unzip directory
    ~/mpcs.51050/camelinaction-source
- Windows
    -- ActiveMQ in Action unzip directory
    c:\mpcs.51050\amq-in-action-example-src
    -- Camel in Action unzip directory
    c:\mpcs.51050\camelinaction-source
Once you've done all of the above, start a terminal and execute the following commands to verify that your environment is set up correctly:
java -version    (should be 1.8.x or 1.7.x)
mvn  -version    (should be 3.5.3)
Next we want to see if ActiveMQ, our enterprise message queue system, is running. You can verify this by typing:
netstat -an | grep 61616 (Windows: netstat -an | find "61616")
You will want to see something like:
tcp6 0 0 [::]:61616 [::]:* LISTEN
If ActiveMQ is not running, revisit the steps for installation which also include how to start and stop ActiveMQ and make sure you follow the steps to start ActiveMQ server. You cannot continue until ActiveMQ is up and running.
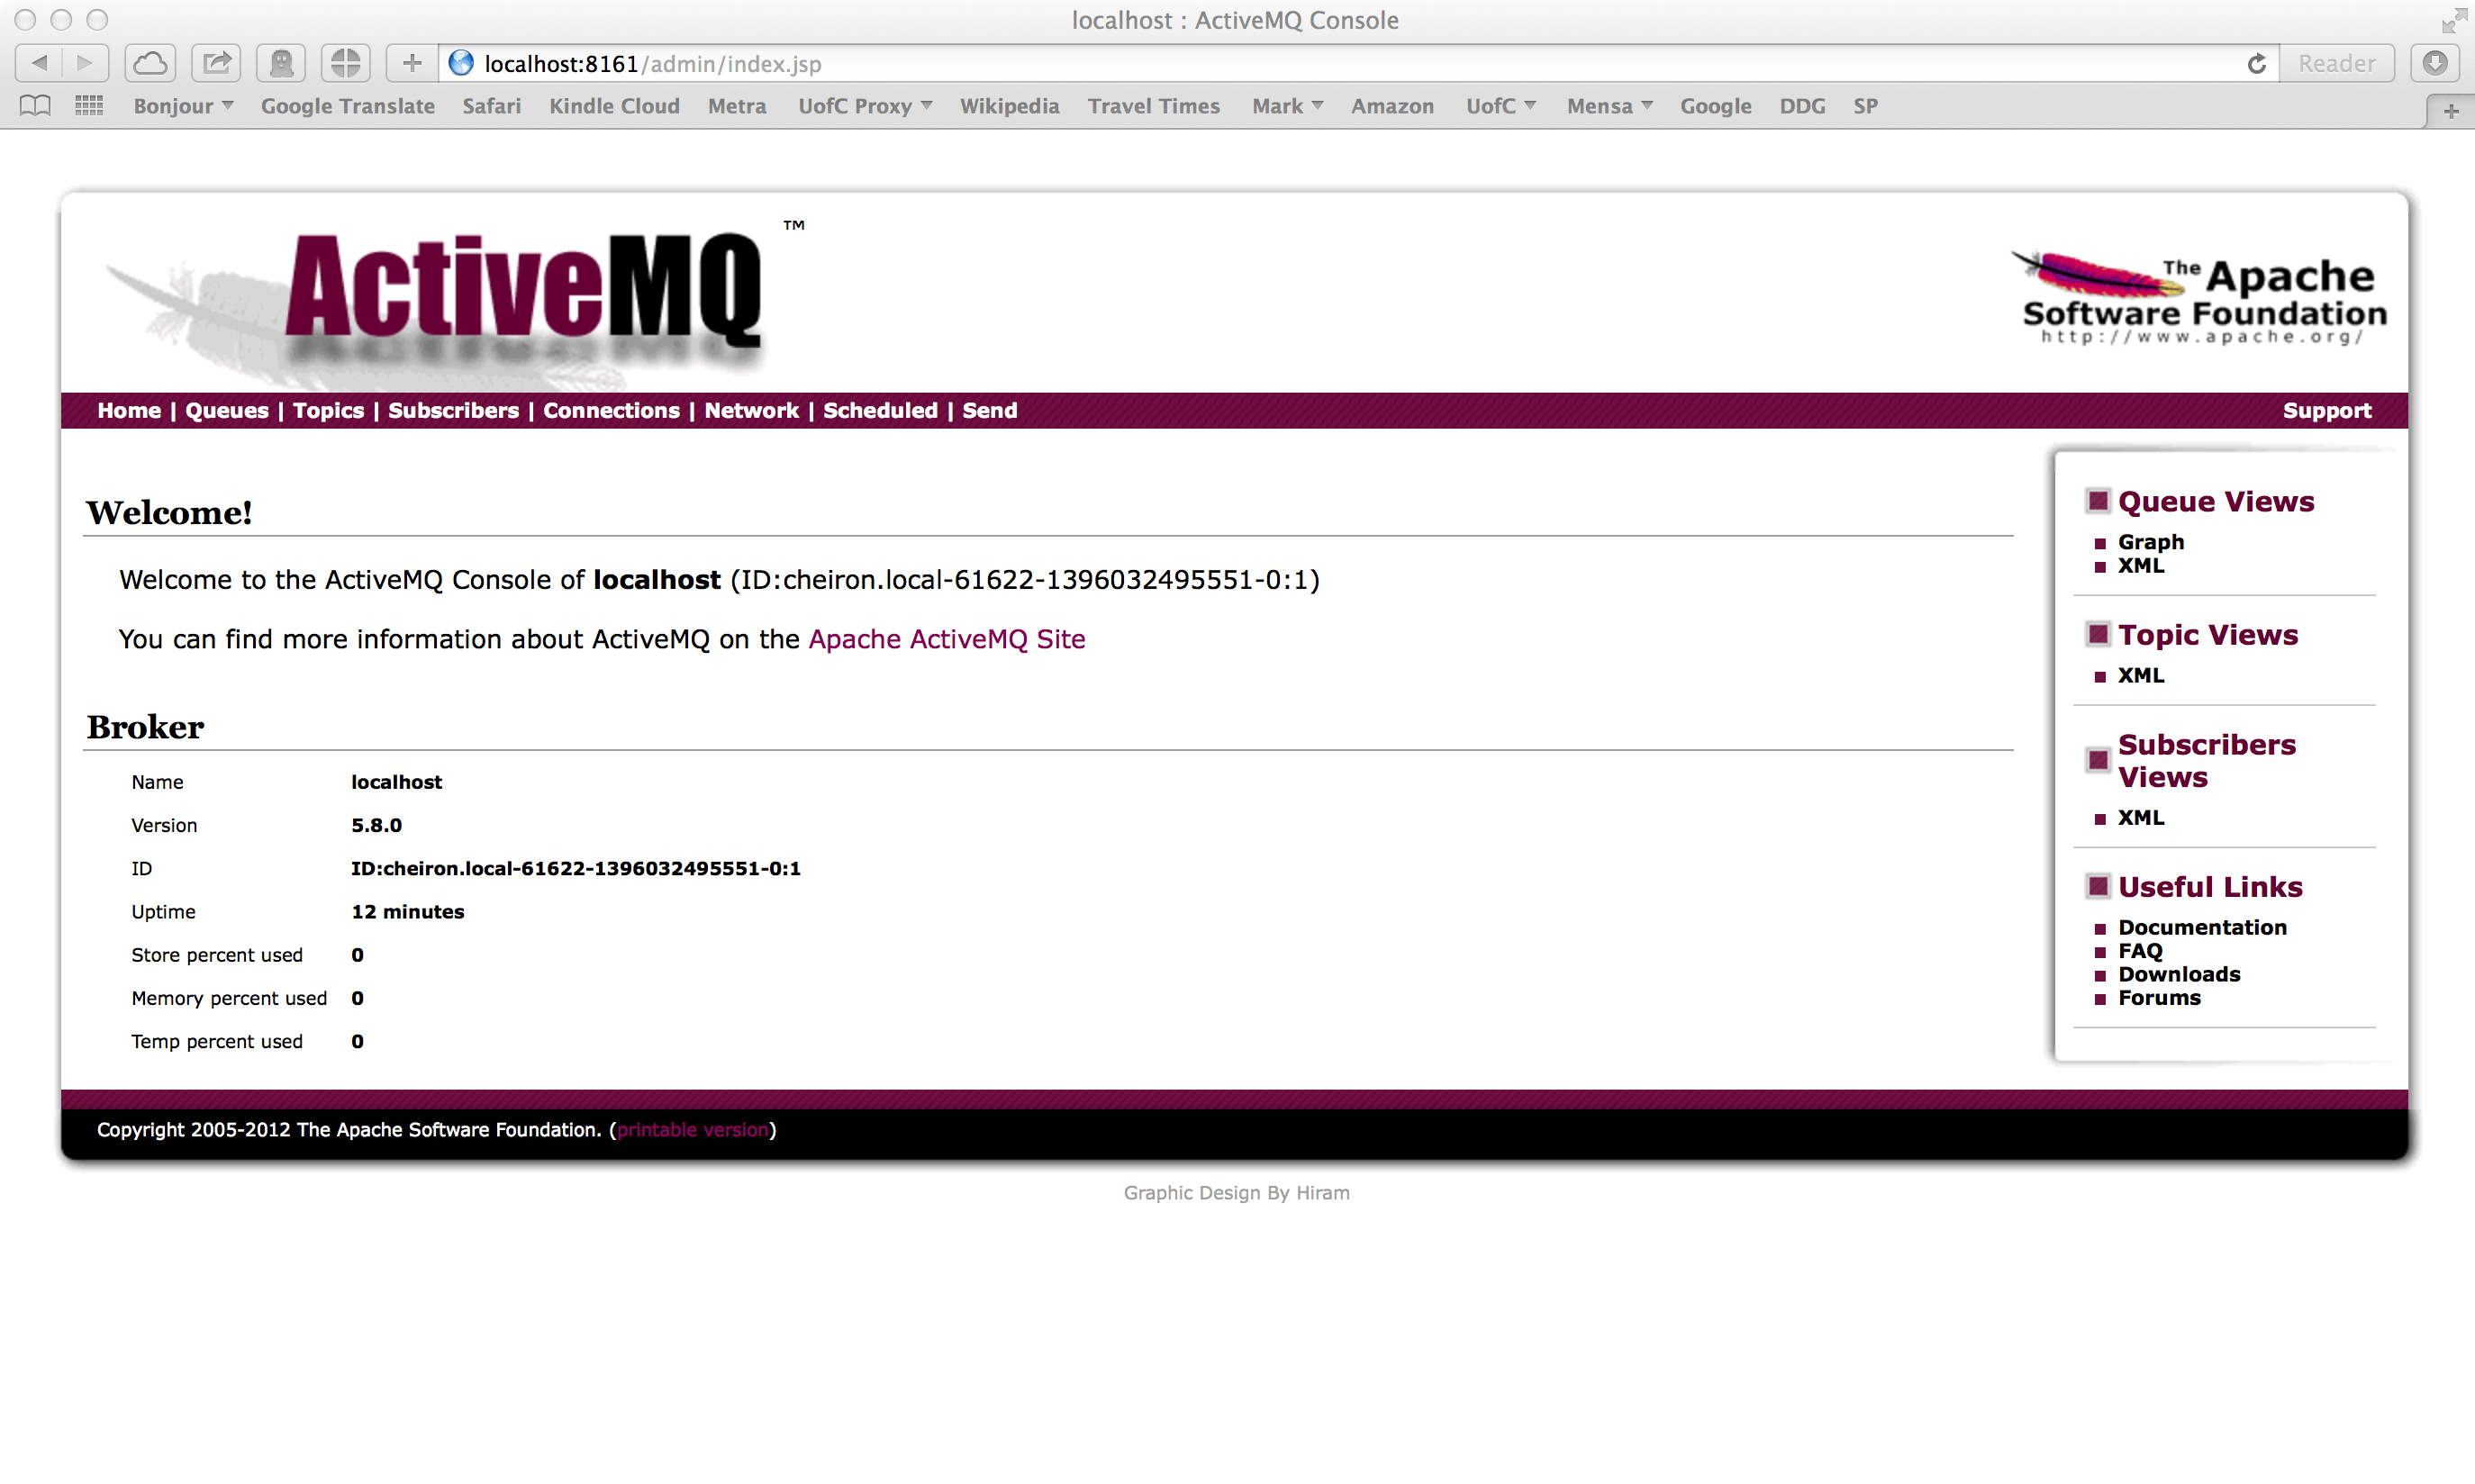
Now, we will view ActiveMQ's web administrative interface. Bring up a browser, and enter the following URL:
If you are presented with a login prompt, your user id is
"admin" and the password
is "admin". It is not advisable to change these values. We
can't help you remember your changes.
Once you've launched the console, you should see a web page very similar to the following:
We will not belabor this now, but you will see that you can click on several tabs, including Queues and Topics, to see the messages that are going to be put on the ActiveMQ broker. We will see a little of this in a minute. For right now, go ahead and click on "Queues" and you will see that you don't currently have any queues defined.
Now, we want you to set up your Maven repository for the sample code from Snyder et. al. ActiveMQ in Action and Ibsen & Anstey, Camel in Action. Open a terminal and navigate to ~/mpcs.51050 (Windows: c:\mpcs.51050) and you should see two folders, one for the Camel book example source and one for the ActiveMQ book (the zipped source code for both of these can also be found here and here):
amq-in-action-example-src
camelinaction-source
In order to set up your local Maven repository (which will be created by Maven and stored in a directory called ".m2" under your home directory), simply change into the amq-in-action-example-src directory and type the following command:
mvn compile
You will see a lot of activity as Maven downloads repository files and compiles code. You should see toward the end of the output the following lines:
[INFO] Compiling 68 source files to /home/[yourloginid]/mpcs.51050/src/amq-in-action-example-src/target/classes
[INFO] ------------------------------------------------------------------------
[INFO] BUILD SUCCESS
[INFO] ------------------------------------------------------------------------
. . .
At this point, issue the following command:
ls ~/.m2/repository (Windows: dir %USERPROFILE%\.m2\repository)
You
should see numerous directories under your repository
directory.
Now change into the camel src code directory which is in camelinaction-source which you created above, and type the same command again:
mvn compile
You will again see a lot of activity as Maven downloads repository files and compiles code. You should see toward the end of the output something like the following lines:
[INFO] Camel in Action :: Appendix C ..................... SUCCESS [0.001s]
[INFO] Camel in Action :: Appendix C :: Producer Template  SUCCESS [0.270s]
[INFO] Camel in Action :: Appendix C :: Consumer Template  SUCCESS [0.230s]
[INFO] ------------------------------------------------------------------------
[INFO] BUILD SUCCESS
[INFO] ------------------------------------------------------------------------
. . .
Now issue the following command (that is the number "1" in the command below, not the letter "l"):
ls -1 ~/.m2/repository/org/apache (Windows: dir %USERPROFILE%\.m2\repository\org\apache)
You should see output similar to the following:
activemq
ant
apache
camel
commons
cxf
felix
ftpserver
geronimo
maven
mina
neethi
openjpa
servicemix
velocity
ws
xbean
The
repository files for activemq are now in your ~/.m2/repository/org/apache/activemq
directory and your repository files for camel are now in your ~/.m2/repository/org/apache/camel
directory.
Now that you have ActiveMQ up and running, obtain and extract this compressed archive . You can put it anywhere you'd like, such as in your mpcs.51050 subdirectory. What you will see is the following directory and file structure:
0 2014-04-09 14:58 file-copy/
0 2014-04-09 14:58 file-copy/data/
0 2014-04-09 14:58 file-copy/data/inbox/
89 2014-03-28 10:56 file-copy/data/inbox/message1.xml
6711 2014-03-28 11:42 file-copy/pom.xml
389 2014-03-28 10:56 file-copy/readme.md
0 2014-04-09 14:58 file-copy/src/
0 2014-04-09 14:58 file-copy/src/main/
0 2014-04-09 14:58 file-copy/src/main/java/
0 2014-04-09 14:58 file-copy/src/main/java/camelinaction/
2189 2014-03-28 11:37 file-copy/src/main/java/camelinaction/FileCopierWithCamel.java
0 2014-04-09 14:58 file-copy/src/main/resources/
1738 2014-03-28 10:56 file-copy/src/main/resources/log4j.properties
Give the following commands now to extract the files and change into the new directory:
unzip file-copy.zip                  (Windows: Use 7-zip)
cd file-copy
These files are taken and modified from the simple file-copy example provided in Chapter 1 of the text Camel in Action by Ibsen and Anstey (pp. 10ff). The code has been modified because we are not only trying to validate that Camel is set up and ready for business but also that your ActiveMQ environment is up and running. The modified file-copy program accomplishes just that. cd into your new file-copy subdirectory.
Now we are ready to use Maven to compile our example program.
mvn compile
You may see a bunch of files downloading, but if things go well, you should also see something like this at the end:
...
[INFO] Building Camel in Action :: Chapter 1 :: File Copy
Example 1.0.0
[INFO]
------------------------------------------------------------------------
[INFO]
[INFO]
--- maven-resources-plugin:2.5:resources (default-resources) @
chapter1-file-copy ---
[debug]
execute contextualize
[INFO]
Using 'UTF-8' encoding to copy filtered resources.
[INFO]
Copying 1 resource
[INFO]
[INFO]
--- maven-compiler-plugin:2.3.2:compile (default-compile) @
chapter1-file-copy ---
[INFO]
Compiling 1 source file to
/private/tmp/file-copy/target/classes
[INFO]
------------------------------------------------------------------------
[INFO]
BUILD SUCCESS
[INFO]
------------------------------------------------------------------------
[INFO]
Total time: 2.877s
[INFO]
Finished at: Fri Mar 28 12:44:21 CDT 2014
[INFO]
Final Memory: 20M/81M
[INFO]
------------------------------------------------------------------------
What you're looking for is that happily capitalized "BUILD SUCCESS". if you see that, that's a good thing. If you see errors, that's of course a bad thing. You should not see any errors if you've set up your environment correctly. If you do encounter errors, start posting to the Piazza site for help from any and all.
Once you've got your Maven project compiled, you can then execute it by typing the following command:
mvn exec:java -Dexec.mainClass=camelinaction.FileCopierWithCamel
You should see a lot of activity, hopefully no errors, and after completion, you should see something like this:
...
[ion.FileCopierWithCamel.main()]
IntrospectionSupport
DEBUG
Clearing cache[size=0, hits=57, misses=58, evicted=0]
[ion.FileCopierWithCamel.main()]
DefaultCamelContext
INFO
Apache Camel 2.12.3 (CamelContext: camel-1) uptime 2.529
seconds
[ion.FileCopierWithCamel.main()]
DefaultCamelContext
INFO
Apache Camel 2.12.3 (CamelContext: camel-1) is shutdown in
0.015 seconds
[INFO]
------------------------------------------------------------------------
[INFO]
BUILD SUCCESS
[INFO]
------------------------------------------------------------------------
[INFO]
Total time: 6.041s
[INFO]
Finished at: Fri Mar 28 14:10:20 CDT 2014
[INFO]
Final Memory: 13M/81M
[INFO]
------------------------------------------------------------------------
After running the above, you should be able to refresh your browser (or click on Queues from the home screen) and you should see something like this:
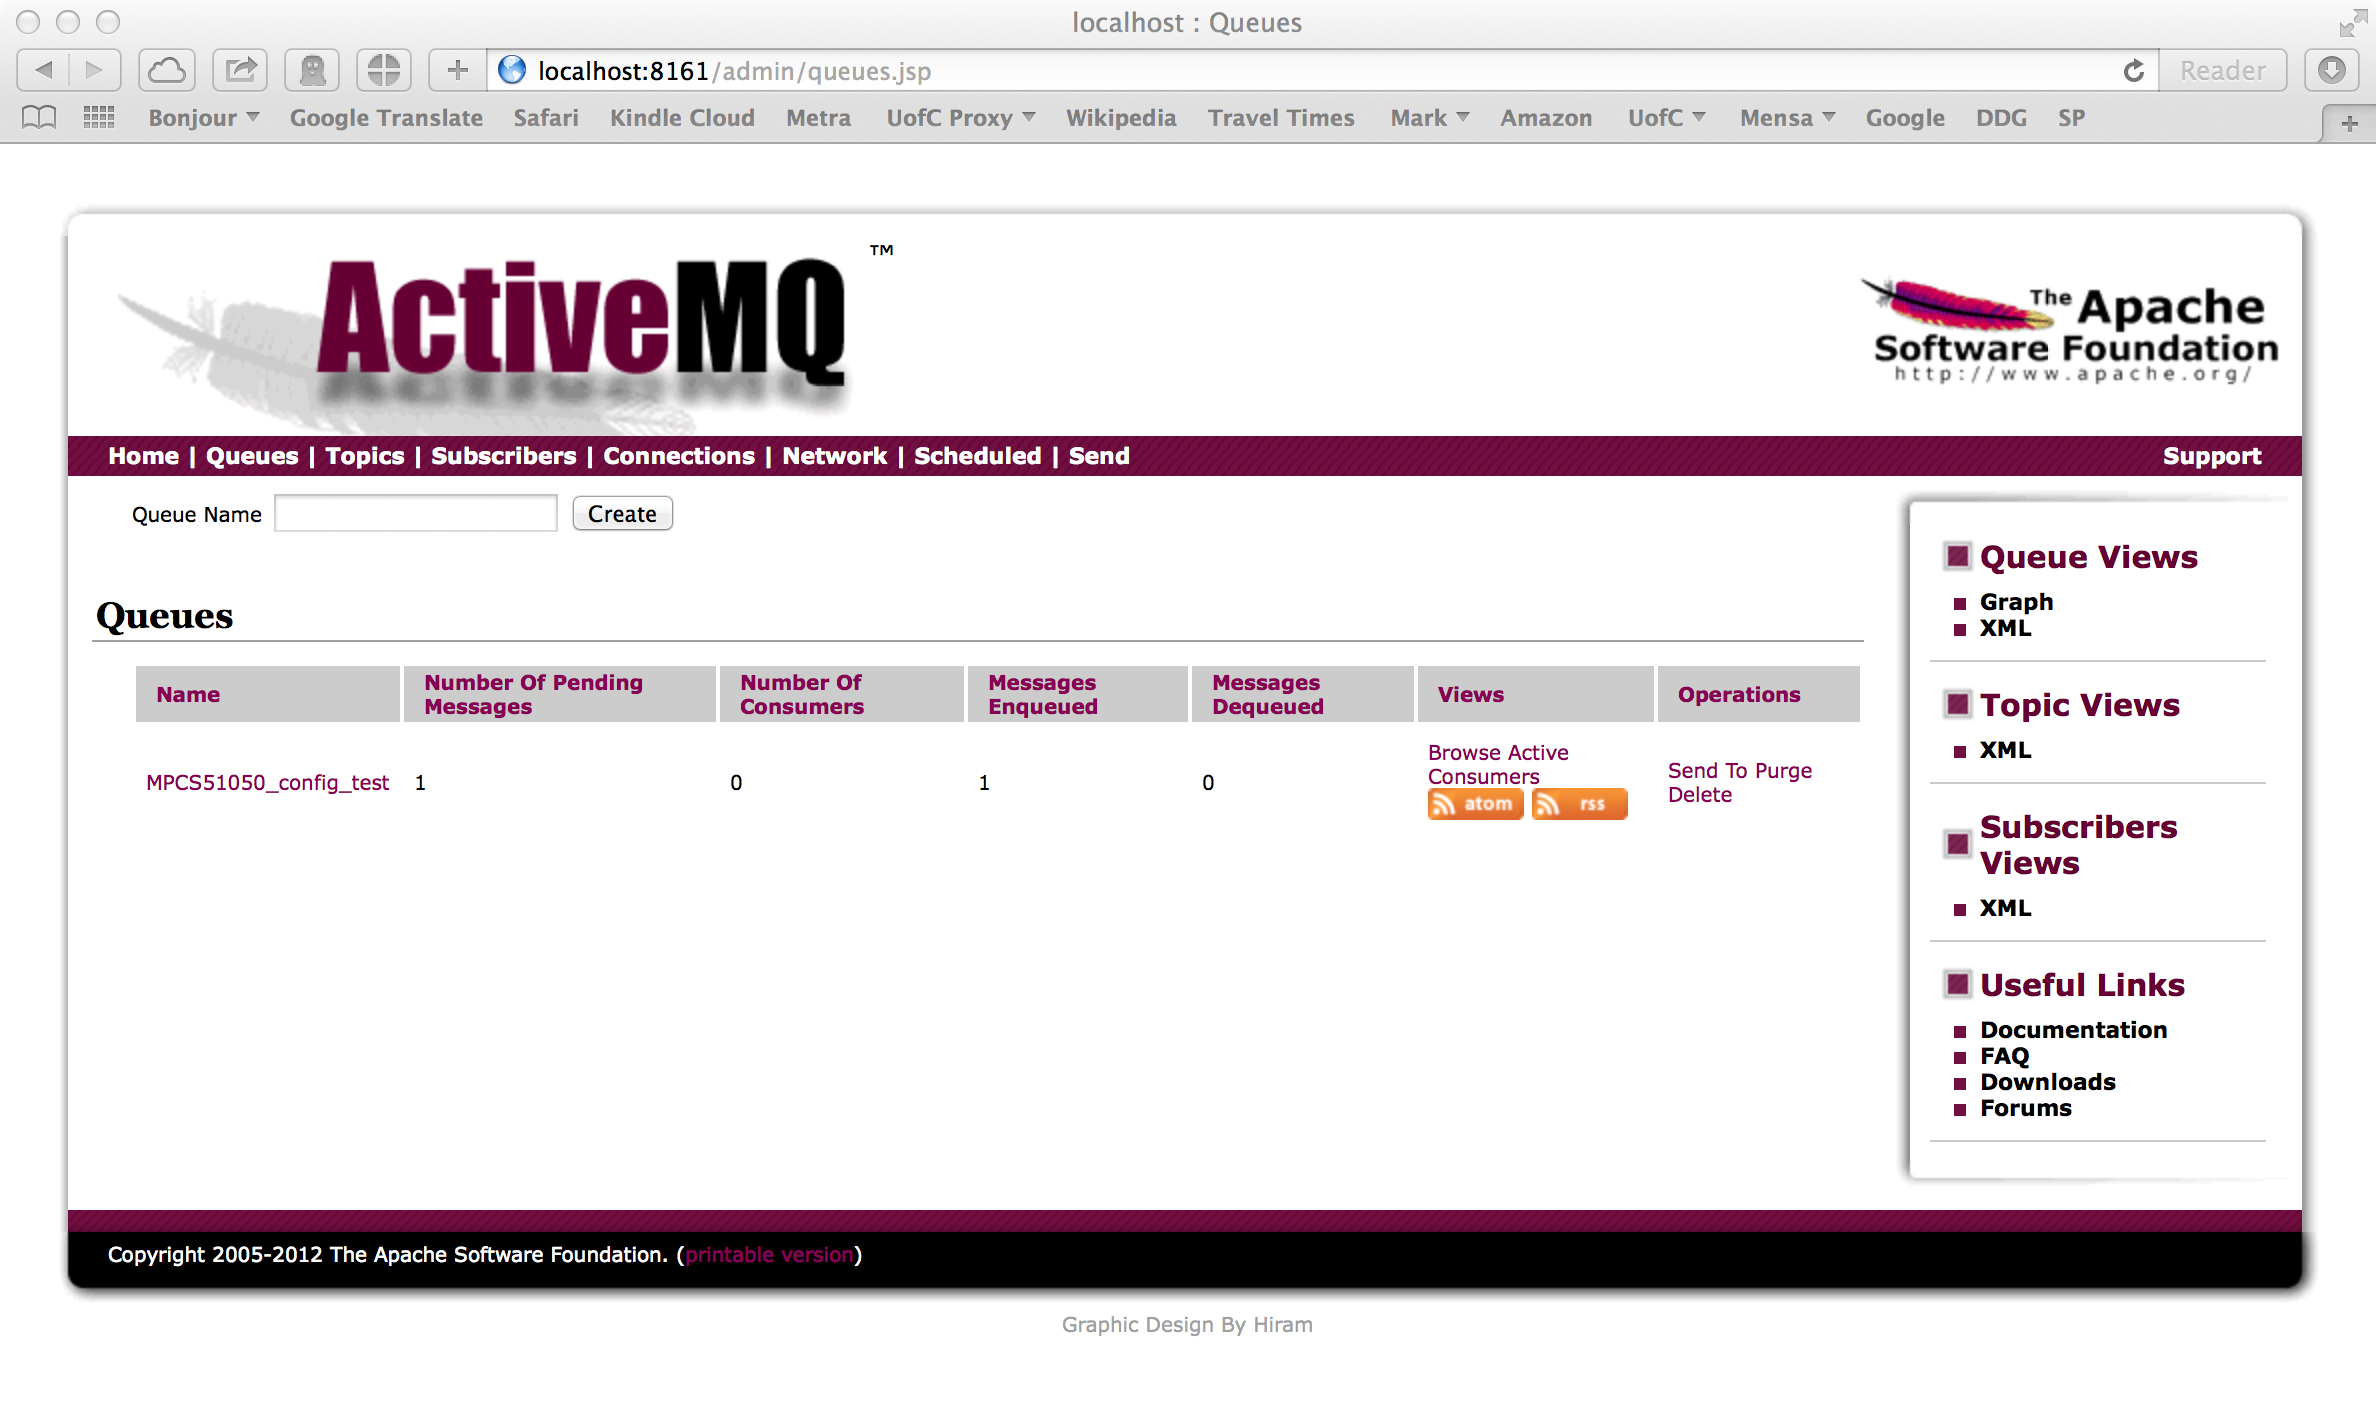
Seeing that you now have a new queue (created by your file-copy program) called MPCS51050_config_test, and that it has one message on the queue (Number of Pending Messages) is a GREAT THING. You're almost done. You can even click on the queue name and on the next screen click on the message identifier to investigate the actual message:
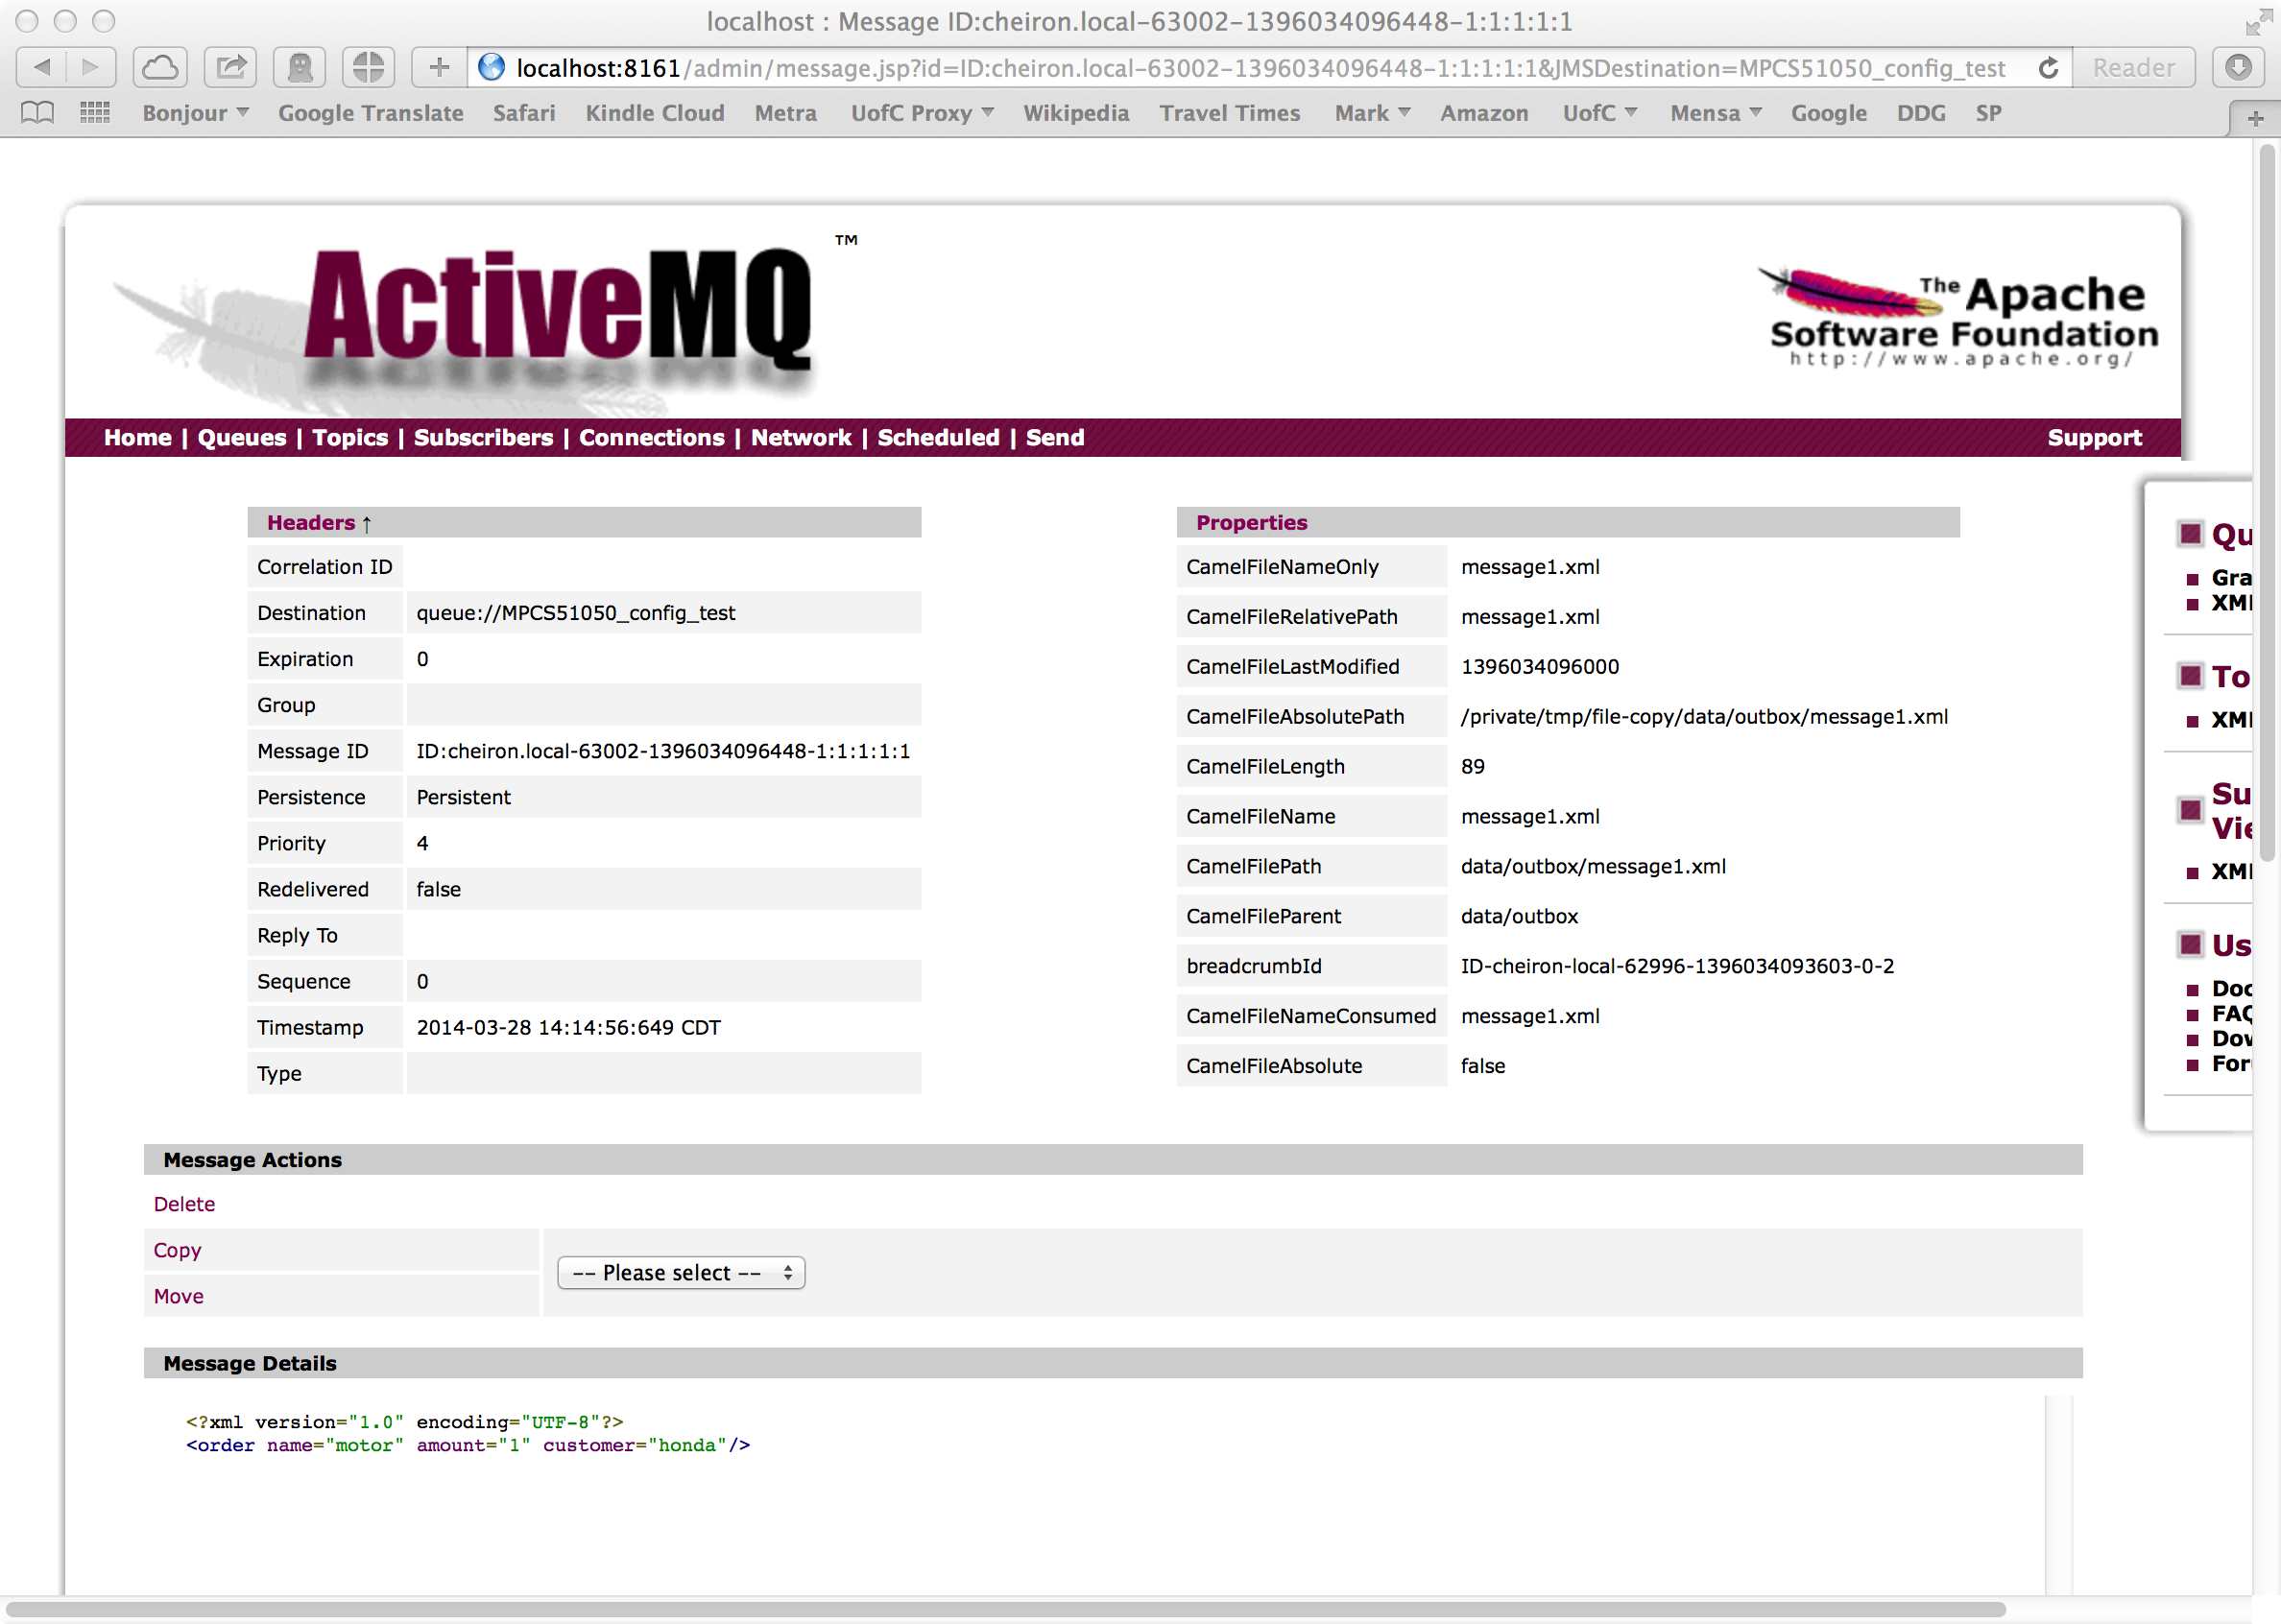
Here you can see the details of your message, including, at the bottom, the actual text of the message itself. You can compare this to the text in your Maven build directory in the file:
$ cat data/inbox/message1.xml                         (Windows: type data\inbox\message1.xml)
<?xml version="1.0" encoding="UTF-8"?>
<order name="motor" amount="1" customer="honda"/>
If you've made it this far, you are almost done. Next we are going to create an Eclipse project for the code we just ran.
Launch Eclipse now.
You will be prompted with a dialog that looks similar to the following:
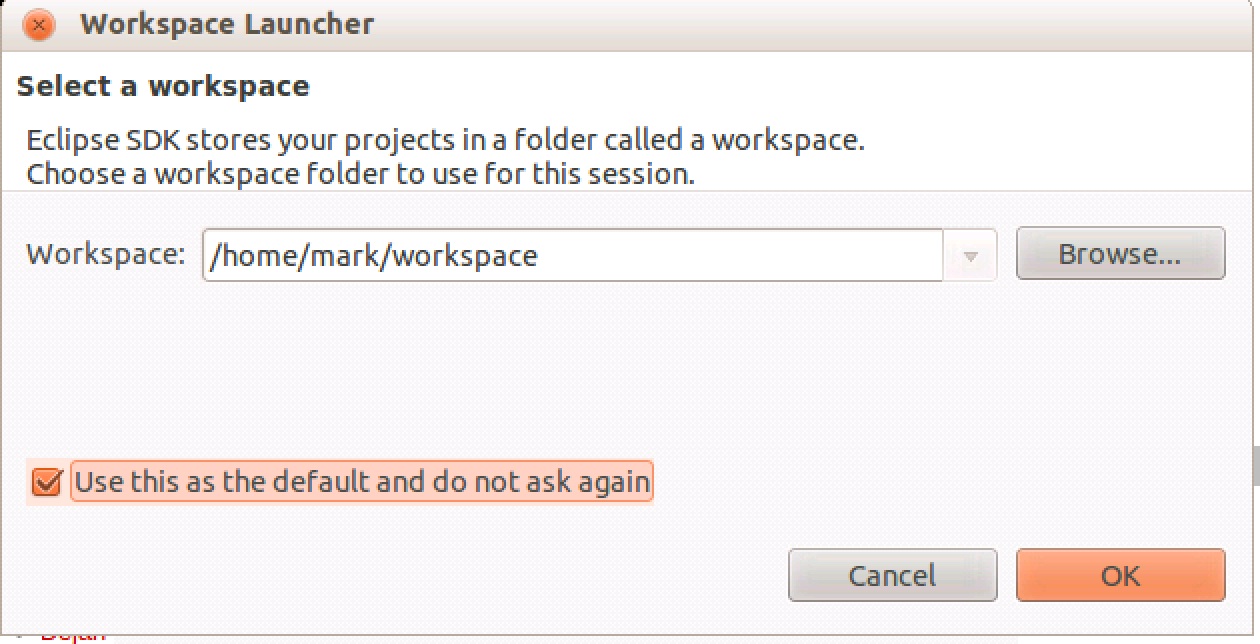
You can leave the workspace directory default or change it if you'd prefer
a different location for your source files, but either way NOTE THIS DIRECTORY
as you will need it in the next step.
This directory will be the parent directory for all the projects we work with
in Eclipse.
Click on "OK".
All that's left now is to import this Maven project into Eclipse and run it from there. This is done with just a few commands. Make sure you are in the file-copy directory where you compiled the code earlier using mvn. In order, execute the following commands:
        mvn -Declipse.workspace=YOURWORKSPACEPATHHERE eclipse:configure-workspace
        mvn eclipse:eclipse
Note
that
you will need to set the eclipse.workspace to whatever you
defined as
your Eclipse workspace directory. What this does is create
some
hidden files (such as .project) that represent Eclipse project
instructions. All that's left now is to import this
directory
into Eclipse. Start Eclipse.
Once you've started
it, from the Eclipse main menu choose "File", then "Import",
then
expand "General" and choose "Existing Projects into
Workspace".
Then click on "Next".
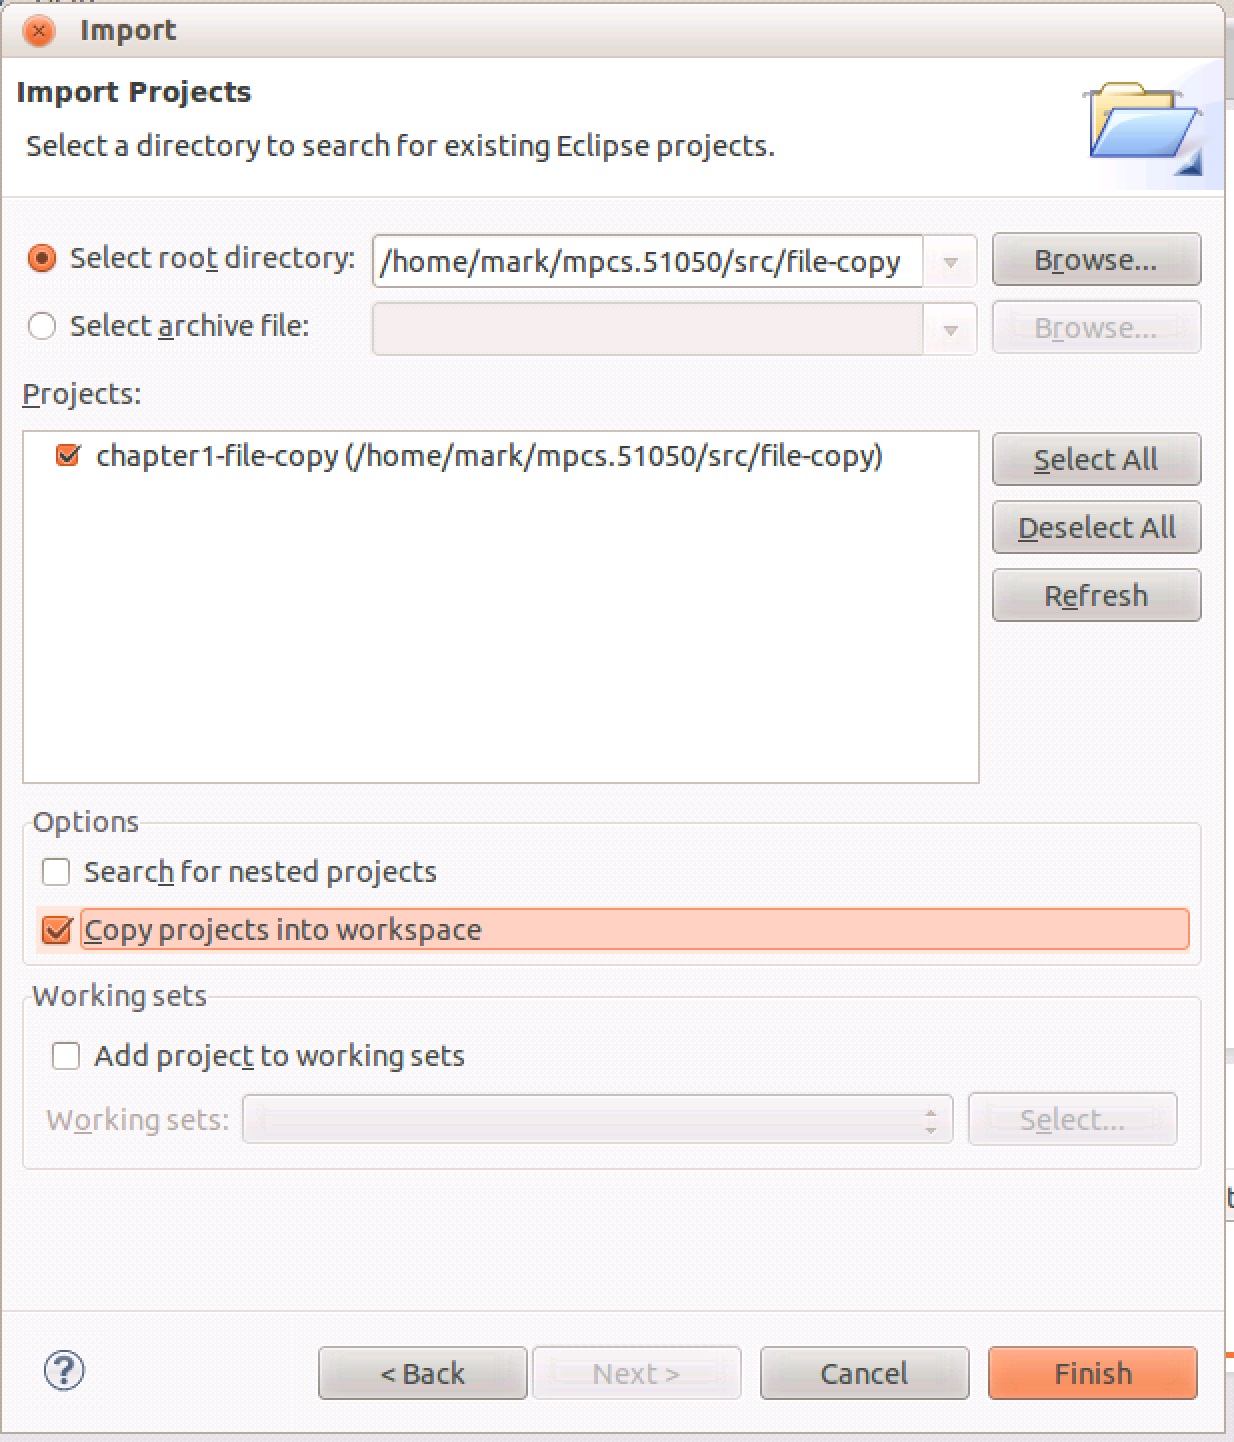
You should select the file-copy directory in which you ran the
above
Maven commands in by clicking
"Browse". Then click on "OK". Once you've selected
that
directory and clicked on "OK", you should see the following
dialog
filled out (of course your home directory will vary).
Before
clicking on "Finish", make sure you check the
option
"Copy projects into workspace". Once your dialog looks
like the
one below, click on Finish.
You
should see the file-copy project appear in the Package Explorer
in Eclipse:
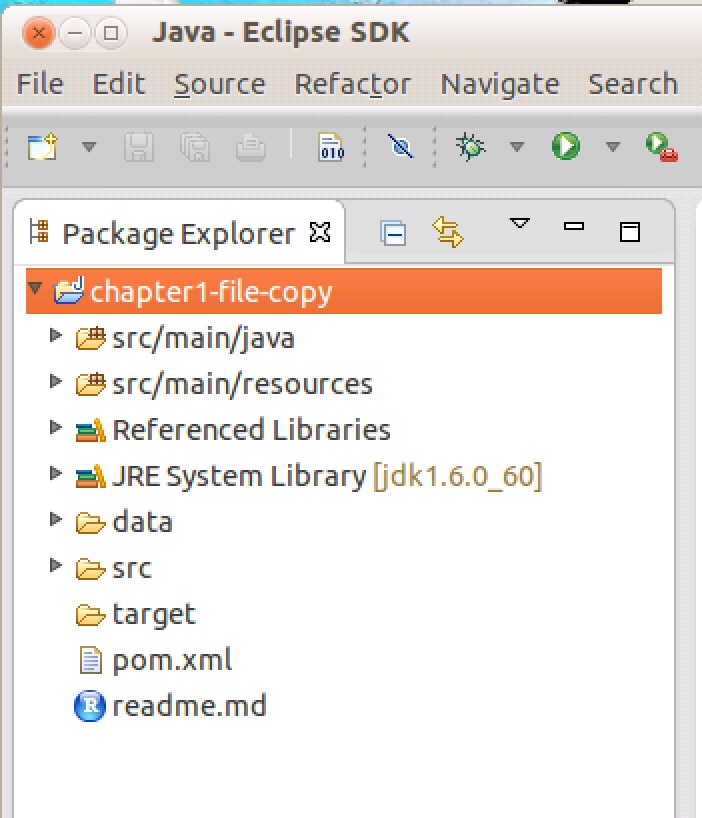
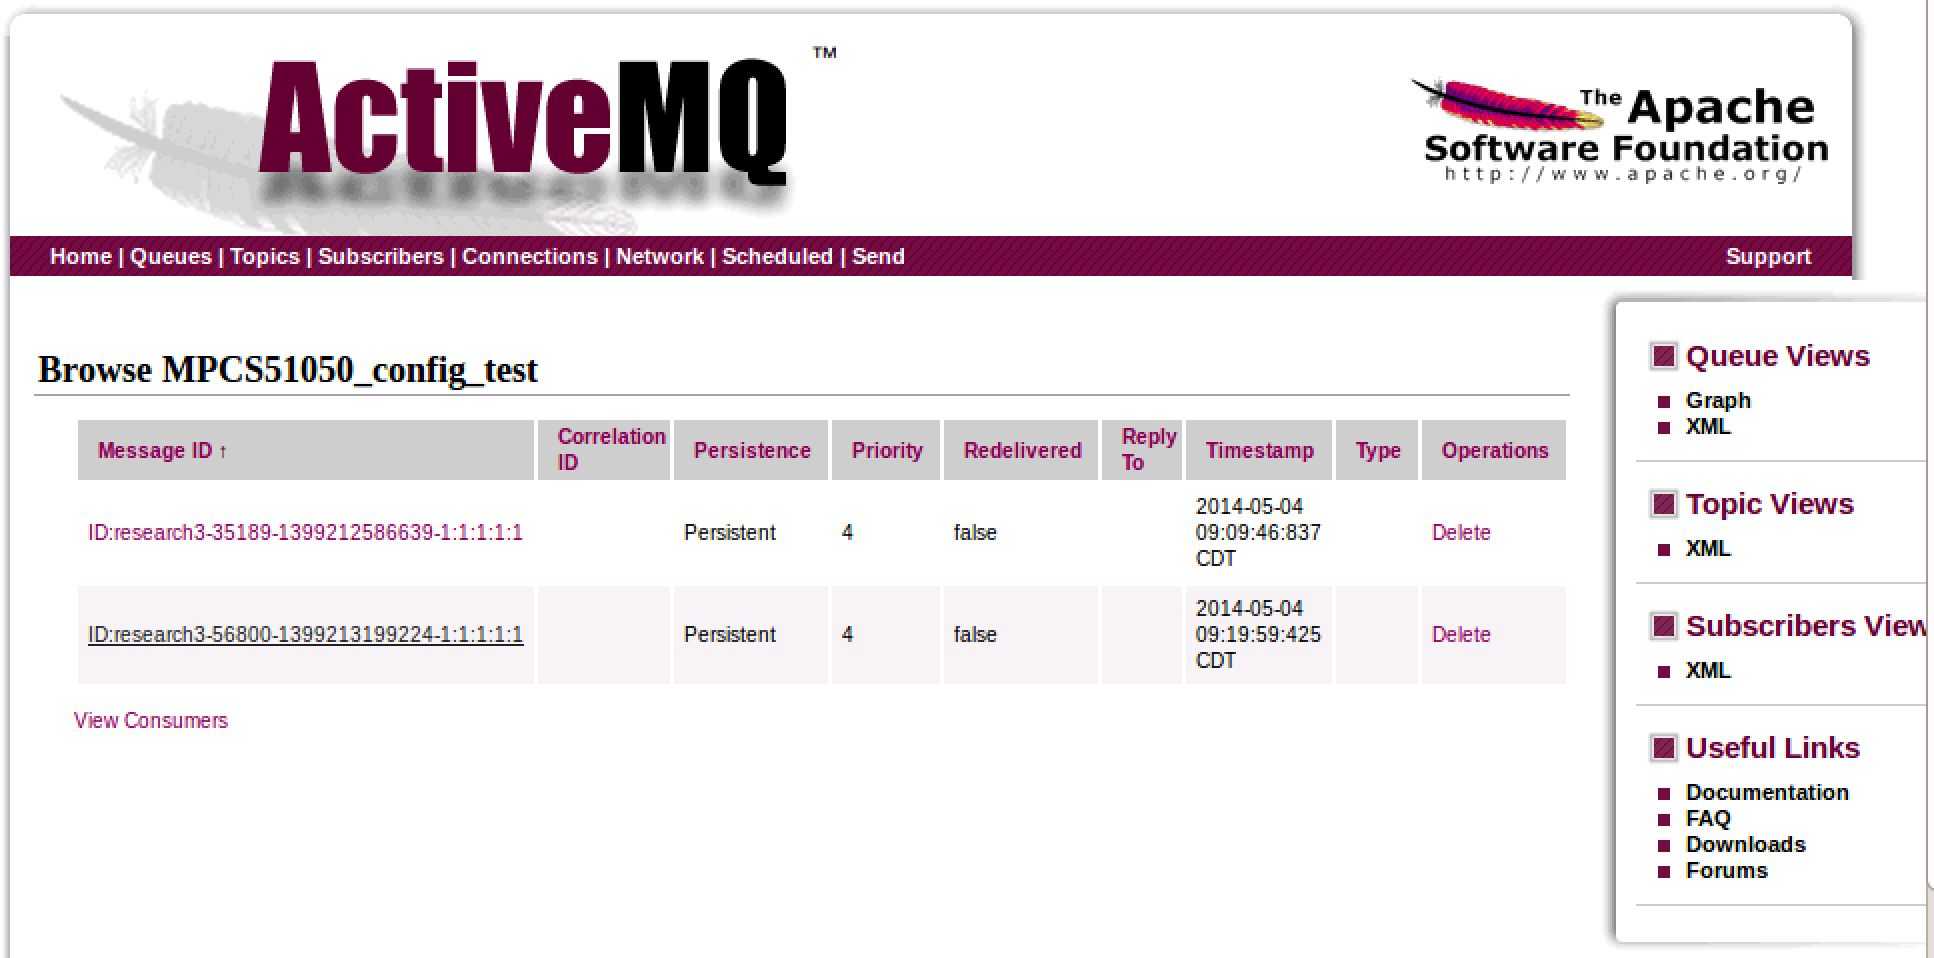
You should not see any errors. At this point, you should be able to execute the project in Eclipse. After giving the Run command, you will be prompted for a main function to use, and you should select FileCopierWithCamel, and then your project should run to completion. You should now go back into your ApacheMQ console, and you should refresh the pages and verify that you now have two messages in your MPCS51050_config_test queue:
Problem
2 of 2
(Point-To-Point Exercise: Reading data from files,
consuming
those files, putting them on a queue, and then consuming
them from the
queue):
In this lab, you will use Camel's DSL to create a Producer program that consumes data from files in an input directory and for each file writes that data onto a Point-To-Point Message Queue. You will also write a Consumer Program that reads those messages from that Point-To-Point Queue and writes those messages out to an output directory.
What you need to implement:
The data files are CSV files that each contain trade data that contains a Ticker, a Buy Price, a Quantity, and a Sell Price and Sell Quantity. Each line in the CSV files looks something like this:
MSFT,22.81,118,22.82,68
So in this example, the ticker would be "MSFT", the buy price would be 22.81, the Buy Quantity would be 118 (shares), the Sell Price would be 22.82, and the Sell Quantity would be 68 (shares).
You can create 100 CSV files of this type of data by running this script and executing on this data input file. Something like this (you can put first.100.csv wherever you want, just remember where you put it):
        broadcaster.sh first.100.csv
        - Mac OS tip:  `brew install gawk` may be needed
        - Windows tip: Use "Git Bash" to execute broadcaster.sh: `sh broadcaster.sh first.100.csv`
        - Linux:       Should work as-is
Our suggestion would be to put the broadcaster.sh shell script
in a
directory that is part of your $PATH, so you can execute it from
any
directory. One suggestion would be /usr/local/bin, because
the convention for that
directory is suited to a miscellaneous script you'd like to
install to the
local machine.
We are assuming that you have thoroughly read chapters 1-3 of Ibsen & Anstey, Camel in Action, prior to working on this lab. You will also find Appendix A on the Simple expression language helpful for this lab as well.
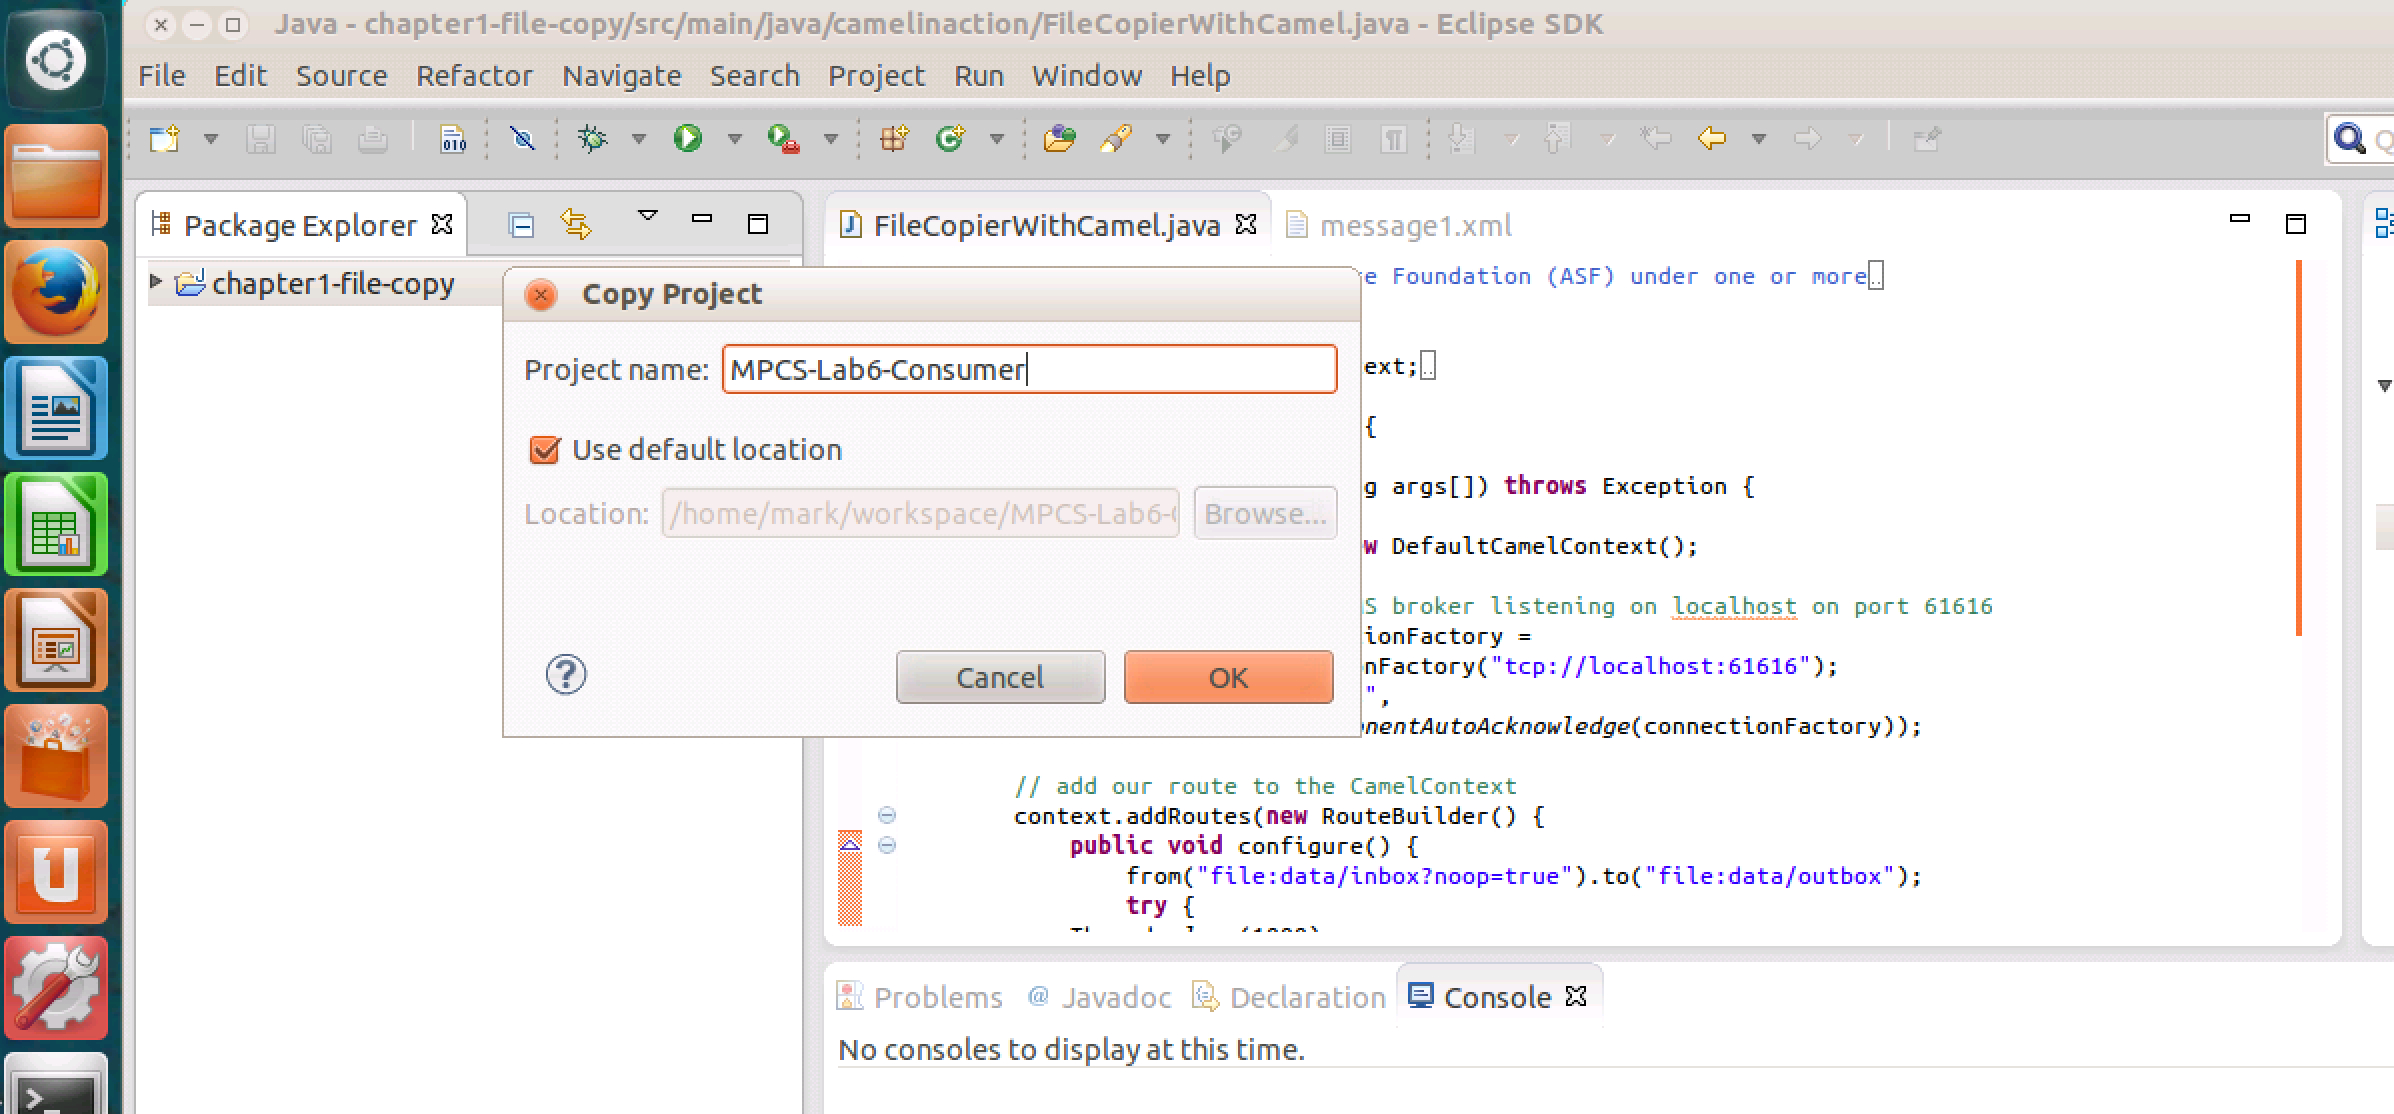
Copy your previous lab 5 project in eclipse to a new project named "MPCS-Lab5-Consumer". You can do this by selecting your lab 5 project "chapter1-file-copy", pressing "Ctrl-C" (or right-clicking and choosing "Copy"), and then pasting a copy of that project by right clicking in the Package Explorer and choosing "Paste", and in the Copy Project dialog renaming the copy to "MPCS-Lab5-Consumer" as you paste, like this:
Now do the same thing again, this time copying your MPCS-Lab5-Consumer project you just pasted and creating a new copy of that project and calling that "MPCS-Lab5-Producer". Now you have three projects in the Package Explorer: chapter1-file-copy, your new MPCS-Lab5-Consumer project, and your MPCS-Lab5-Producer project. (Of course they are all three identical copies for the moment). The advantage of copying chapter1-file-copy is that you bring with you all the maven jarballs that you will need, so you don't have to manually add them through the project properties/Java Build Path.
Now, in a terminal, navigate to your your MPCS-Lab5-Producer directory under your eclipse workspace, and change to the data/inbox subdirectory. Mine looks like this:
~/workspace/MPCS-Lab5-Producer/data/inbox
Remove the message1.xml file that's there, so the directory is empty. Now execute the following line:
broadcaster.sh first.100.csv
Once that command has executed, do an "ls" in your ~/workspace/MPCS-Lab5-Producer/data/inbox directory. You should see 100 files that look something like this:
$ ls
08-05-14_09-55-33.csv 08-05-14_09-56-02.csv
08-05-14_09-56-31.csv
08-05-14_09-57-01.csv 08-05-14_10-47-56.csv
08-05-14_10-54-02.csv
08-05-14_09-55-34.csv 08-05-14_09-56-03.csv
08-05-14_09-56-32.csv
08-05-14_09-57-02.csv 08-05-14_10-47-57.csv
08-05-14_10-54-03.csv
08-05-14_09-55-35.csv 08-05-14_09-56-04.csv
08-05-14_09-56-33.csv
08-05-14_09-57-03.csv 08-05-14_10-47-58.csv
08-05-14_10-54-04.csv
etc.
Your exact filenames will be slightly different as the date-time will have changed. Now, cat out one of the files, and you will see something like this:
MSFT,22.81,118,22.82,68
Each of
the
100 files will contain a single line of data similar to the
above. These 100 data files will constitute your
Producer's
"input". Your Producer will roll through these 100 files,
and
load the content of each file onto an ActiveMQ message queue.
Now you
have some reading to do. Make sure you understand what
Camel is
doing and basically how it works by reading the first three
chapters of
Ibsen & Anstey Camel in
Action along with Appendix A.
As we have moved past using maven in favor of eclipse, you can
ignore
the maven-related instructions (but of course you're free to
execute
the examples all you want and that would prove
instructive). You
can also ignore the java spring information. We will not
be using
java spring in the course, but plain old java POJOs (Plain Old
Java
Objects).
Your your MPCS-Lab5-Producer will do the following:
1.
Read
You are to read through this file using Camel's DSL, establishing a Camel Route that [References to sections of Camel in Action in brackets]:
1.
Consume the input directory "data/input" [CIA 2.3 & 7.1-7.2]
2. Logs the string "RETRIEVED: ${file:name}" [CIA
Appendix A]
3. Unmarshals the data read [CIA 3.4]
4. Runs the CSV translator on the data [CIA 3.4.2]
5. Splits the body (so that the individual lines go on the
queue as individual messages) [CIA 3.4.2]
6. Sends the output to jms:queue:MPCS_51050_LAB5 [CIA
3.4.2]
Read especially the File Component sections on configuration options in CIA 7.2.1, especially understanding the "noop" option and the "fileName" option. You may find that setting "noop=true" will make your testing a bit easier as Camel will not remove the input files as it processes them (which relieves you from having to recreate them with each test using broadcaster.sh).
Once you have developed your code, test it out (this will require several iterations to figure it all out) and you should see that you are publishing 100 messages to your MPCS_5050_LAB5 queue. Once you see that you are doing that, congratulate yourself, and take a break.
Next, you will begin work on your Consumer, in the project you created called MPCS-Lab5-Consumer. Your Consumer will consume the messages off your MPCS_5050_LAB5 queue. As it takes off each message, the message will be removed from the queue. Your route will be fairly simple. In your Consumer route you will need to do the following [References to sections of Camel in Action in brackets]:
1.
Consume messages from the MPCS_51050_LAB5 queue [CIA 7.3]
2. Log the string "RECEIVED: jms queue: ${body} from
file: ${header.CamelFileNameOnly}" [CIA Appendix A]
3. Convert the body of the message taken from the queue
into a string using a String.class conversion [CIA 3.6.2]
4. Write the resulting set of messages out to
"file:data/outbox"
[CIA 7.2.1] appending ".out" to the the current thread name and
the
original Camel input file name in the the output file name [CIA
Table
A.1], with the result that you have 100 files in the data/outbox
directory that look something like this:
$ ls
Thread-Camel (camel-1) thread #0 -
JmsConsumer[MPCS_51050_LAB5]-08-05-14_09-55-33.csv.out
Thread-Camel (camel-1) thread #0 -
JmsConsumer[MPCS_51050_LAB5]-08-05-14_09-55-34.csv.out
Thread-Camel (camel-1) thread #0 -
JmsConsumer[MPCS_51050_LAB5]-08-05-14_09-55-35.csv.out
Thread-Camel (camel-1) thread #0 -
JmsConsumer[MPCS_51050_LAB5]-08-05-14_09-55-36.csv.out
You can use the fileName= option in the output line such
as:
Notes and Hints:
In the referenced Camel
in Action
sections, you will find code examples. Use these as a
guide as to
the DSL syntax for accomplishing the requirements of this
lab.
You will likely find this lab impossible to accomplish without
reading
the assigned sections.
Once
everything is working, you are ready to submit your lab 5.
Submitting:
You should submit your Eclipse directories for the File
Copy, Producer, and Consumer projects (3 projects).
Submit using Subversion into the pre-existing folder for
this lab.
It's a good idea to do a Clean before you submit, or if
using Subclipse
it should take care of not submitting generated binaries and
such.
Please include a README text file that contains any instructions
for the TAs to assist with grading, and design notes are often
the most useful thing you can provide. We do not need any info
on how to compile your code for these Eclipse/maven projects.