Each lab will consist of a small problem and details of how to proceed. Each lab is intended to give every student hands-on experience with the core technologies utilized during the course. A student may concentrate, as a team member, on one technology over another for the final project, but labs are designed to give each and every student exposure to all the technologies that come into play. You need to submit labs to the TAs for grading--see submission instructions below. Generally, unless otherwise specified, you will have one week to complete each assigned lab.
See the syllabus for information on grading. Turning in lab assignments on time is required, without exception, and all late deliveries will be penalized, regardless of cause. Submit your assignments to the subversion repository according to the directions on the syllabus page.
You
may write these solutions in either
Java or C++...your choice.
Lab 1 Due: 5:00 pm, Tuesday, October 31, 2017
Problem 1: Installing and Playing With Docker:
BACKGROUND:
WHAT YOU NEED TO DO:
STEP 1:
First of all, you need to decide on the environment within which you wish to work. You have several different options, and none are specifically pre- or pro-scribed. Essentially, your core options are to:
1. Run everything directly on your laptop.
2. Run a virtual machine on your laptop and do all your work inside that virtual machine.
3. Do some combination of the above.
Professor
Shacklette will discuss these options in some detail the first day of
class. If you choose to work directly on your own laptop (MAC or
Windows 10 or Linux), see Option I below. If you choose to work
within a virtual machine, see Option II below. If you're interested in a combination of the above, see Option
III below. Note that each option begins with the phrase, "If yyou
have the space." By this we mean both disk space, memory, and
number of core processors. There are no absolutes here, and there
are too many variable combinations to delineate, but in general, you
will want at least 100 Gig of free disk space, and at least 8 Gig of
memory on your laptop, and a minimum of 2 cores, 4 or more being
ideal. If your laptop or workstation cannot satisfy these minimum
guidelines, talk to the TAs and they will be able to give you
guidance. Note that trying to do this work on the Linux Cluster
in the MPCS labs may prove less than ideal, as the available diskspace
to students is based on a quota. Nonetheless, if this is your
only, or even preferred, option, talk to Professor Shacklette and
something might be able to be done to work that out.
Option I: Run everything directly on your laptop
If you have the space, you may wish to install and run docker and all images and containers direclty on your laptop. Docker is available for most platforms, including MacOS, Windows, and Linux. This is a relatively easy option and straigtforward. The only downside to this option is that your 51212 development environment is not "contained" and separate from your working laptop environment as would be the case in Option II below. If you choose to go this route, do the following:
1. Download and Install docker directly onto your laptop
To install docker directly on a Mac, begin here to install the Stable version. I would suggest following the instructions on installing the Docker Application natively (aka "Docker for Mac"), as opposed to using the older Docker Toolbox. You may find a discussion of the differences here. To install docker directly on Windows 10, begin here to install the Stable version. Docker for Windows requires 64bit Windows 10 Pro with Hyper-V. Take a look here for more information on requirements for Windows. If you prefer to install Docker on Linux, you may, as Ubuntu, CentOS, RedHat, etc. are variously supported. See here for instructions for Ubuntu (but see next sentence!) and here for instructions for RedHat (Fedora). Further instructions for all platforms can be found here. NOTE: If you are installing on ubuntu, you will find these simple steps much easier:
$ sudo apt-get update
$ sudo apt-get install docker.io
$ sudo service docker status [this will verify that docker has been installed and is running]
$ sudo adduser USERNAME docker [replace "USERNAME" with your own ubuntu username]
Once you have installed docker, run the docker "Hello World" container to verify the sanity of your installation (depending on OS and environment, you may need to manually start Docker (i.e. /Applications/Docker.app, etc.) or even reboot your Windows machine. Here is an example of what you should see (on MacOS) when you run the Hello World exmaple (you type the command "docker run hello-world"):
$ docker run hello-world
Unable to find image 'hello-world:latest' locally
latest: Pulling from library/hello-world
5b0f327be733: Pull complete
Digest: sha256:1f19634d26995c320618d94e6f29c09c6589d5df3c063287a00e6de8458f8242
Status: Downloaded newer image for hello-world:latest
Hello from Docker!
This message shows that your installation appears to be working correctly.
To generate this message, Docker took the following steps:
1. The Docker client contacted the Docker daemon.
2. The Docker daemon pulled the "hello-world" image from the Docker Hub.
3. The Docker daemon created a new container from that image which runs the
executable that produces the output you are currently reading.
4. The Docker daemon streamed that output to the Docker client, which sent it
to your terminal.
To try something more ambitious, you can run an Ubuntu container with:
$ docker run -it ubuntu bash
Share images, automate workflows, and more with a free Docker ID:
https://cloud.docker.com/
For more examples and ideas, visit:
https://docs.docker.com/engine/userguide/
The key is to see that lovely "Hello from Docker!" output (although yours probably won't be in purple!).
Once you see that, congratulations, you're off to the races. Pay
no attention to the "Unable to find image" warning, that's normal and
par for the course, because that's the first time you ran hello-world
and no image was local in your local repository, so it was downloaded
from the docker hub.
Option II: Run a virtual machine and do all your work inside that virtual machine
If
you have the space, you may wish to install and run docker and all
images and containers within a virtual machine, such as VirtualBox, on your laptop. Doing so will involve firstdownloading VirtualBox
(or VMWare, etc.) onto your laptop, and installing a core operating
system within that VM. These instructions will walk you through
installing VirtualBox, then Ubuntu Linux, and then finally docker,
which of course is available for
most platforms, including Ubuntu Linux. This is a
slightly more complex option than Option I above. The advantage
to this
option is that your 51212 development environment is completely
"contained"
and separate from your working laptop environment, which among other
things will keep your laptop working as it currently is and will allow
you to "throw away" the 51212 workspace and virtual machine after the
class is over if you so desire. If you don't care about keeping
your current laptop environment pristine, go with the simpler Option I
above.
If you choose to go this route, do the following:
First,
obtain a virtual machine environment. There are several
choices. If you happen to have a paid VMWare account, you can use
VMWare. But you're better off using the free VirtualBox from
Oracle. You can download it here
(choose the right platform for your laptop). Once downloaded,
install VirtualBox onto your system. Launch VirtualBox and make
sure it is running.
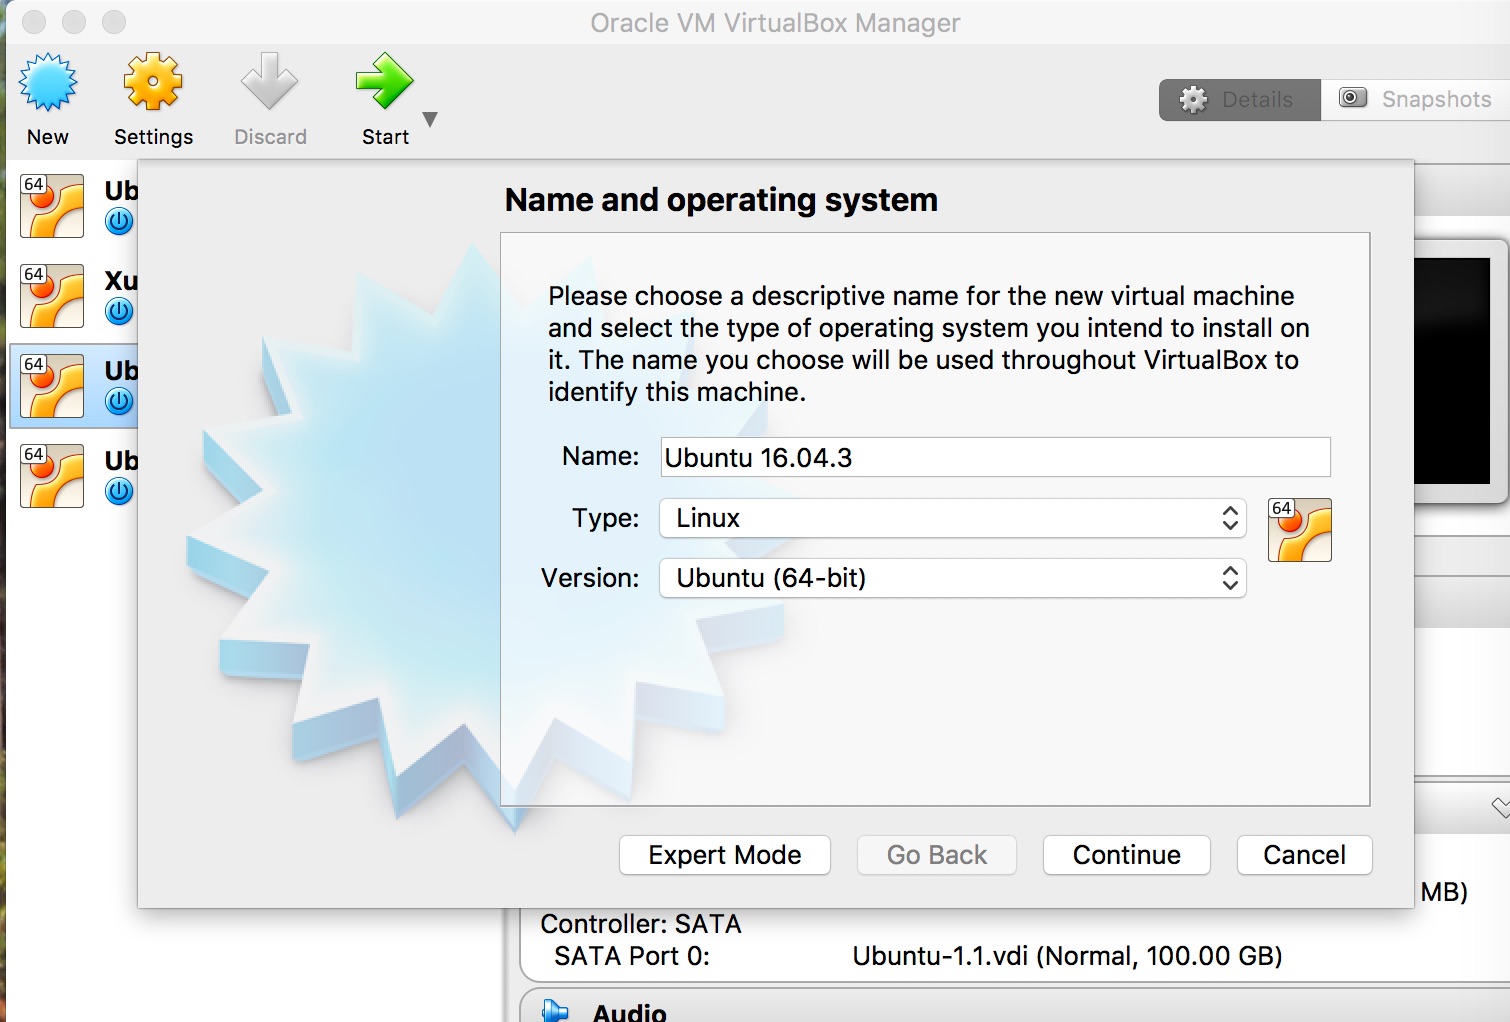
Next, download Ubuntu 16.04.3 LTS to your local hard drive's downloads folder and save it. You can find the Ubuntu download page here. You can also find detailed installation instructions here. The file you download (for the Mac) should be named "ubuntu-16.04.3-desktop-amd64.iso." Now return to your VirtualBox, and click on New to create a new virtual machine. Choose a Linux machine type and version Ubuntu 64-bit and name it whatever you want (I happen to have named it "Ubuntu16.04.3"), as in this screenshot:
Follow the installation instructions here, and use the following initial settings as you go through the installation in VirtualBox:
Memory Size: 2048 Mb
Hard Disk: Choose to create a virtual hard disk now, and click on Create
At the next screen, choose Expert Mode. Then, if you have the space, choose to create a 100 Gig virtual disk, as in this screenshot:
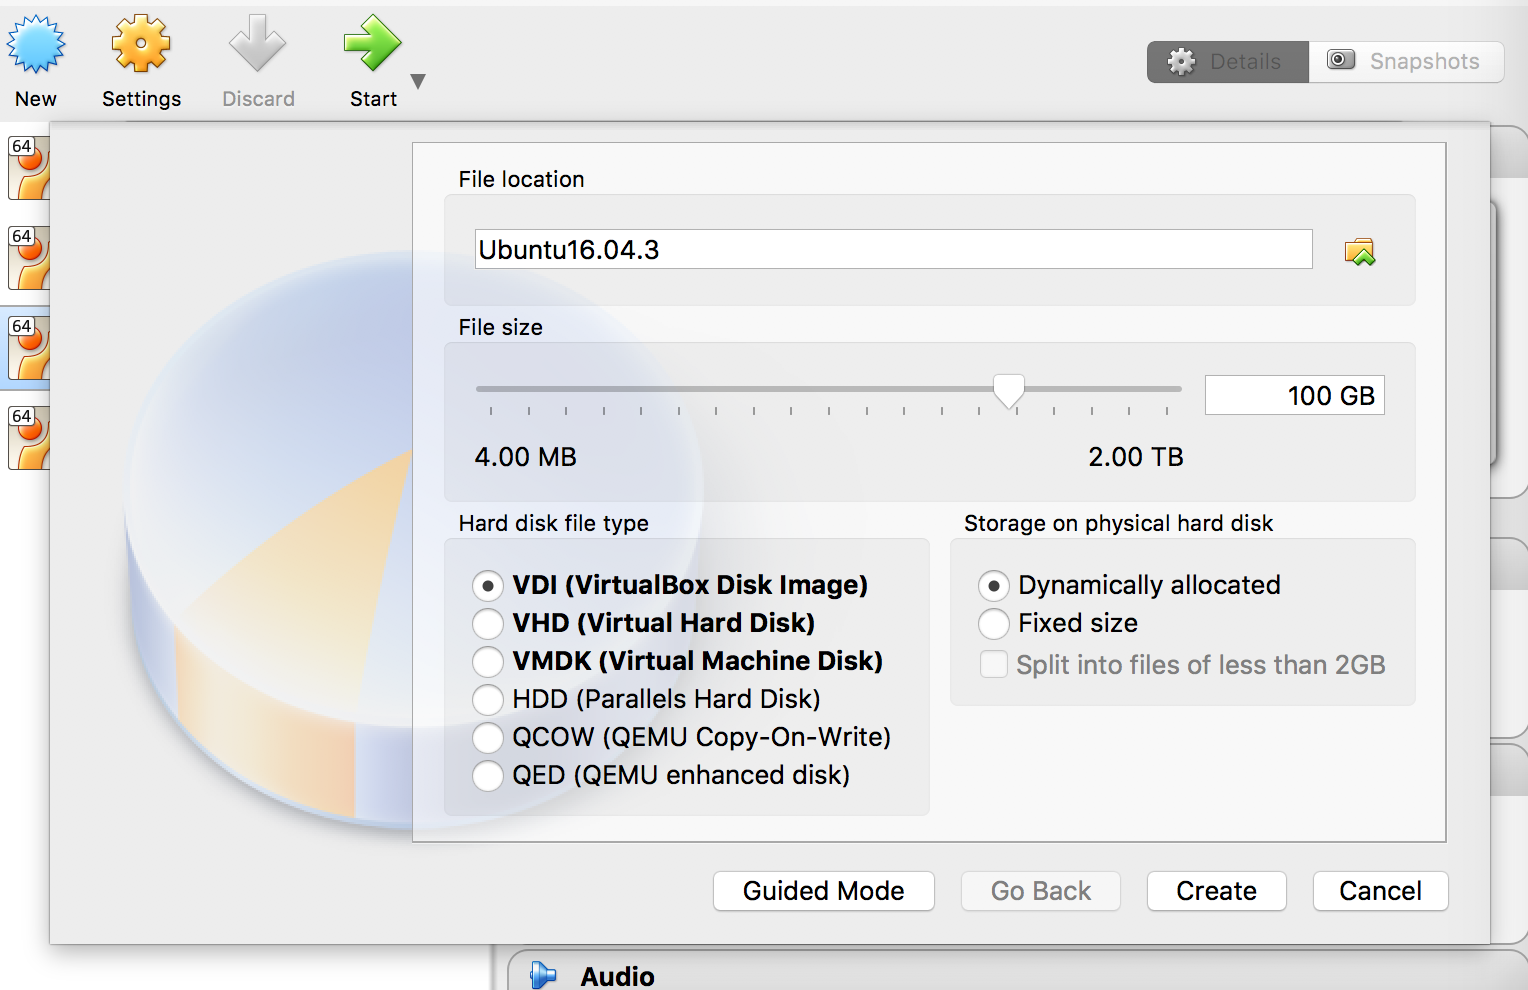
Note that the 100 GB is virual and will be dynamically allocated on demand....that is, the initial virtual disk size will be much less than that, likely well under 10 Gig and closer to 2 Gig. Nonetheless, your disk can dynamically grow if and as necessary. If you don't have 100 Gig available, use as much as you do have, minus 5 Gig (e.g. if you only have 50 Gig available, choose a 45 Gig VDI).
Save all that, and you now have a new virtual machine. Now choose your new virtual machine and click on run. At the next screen, you will be prompted which disk image you wish to load into the virtual CD Rom drive, as in this screenshot:
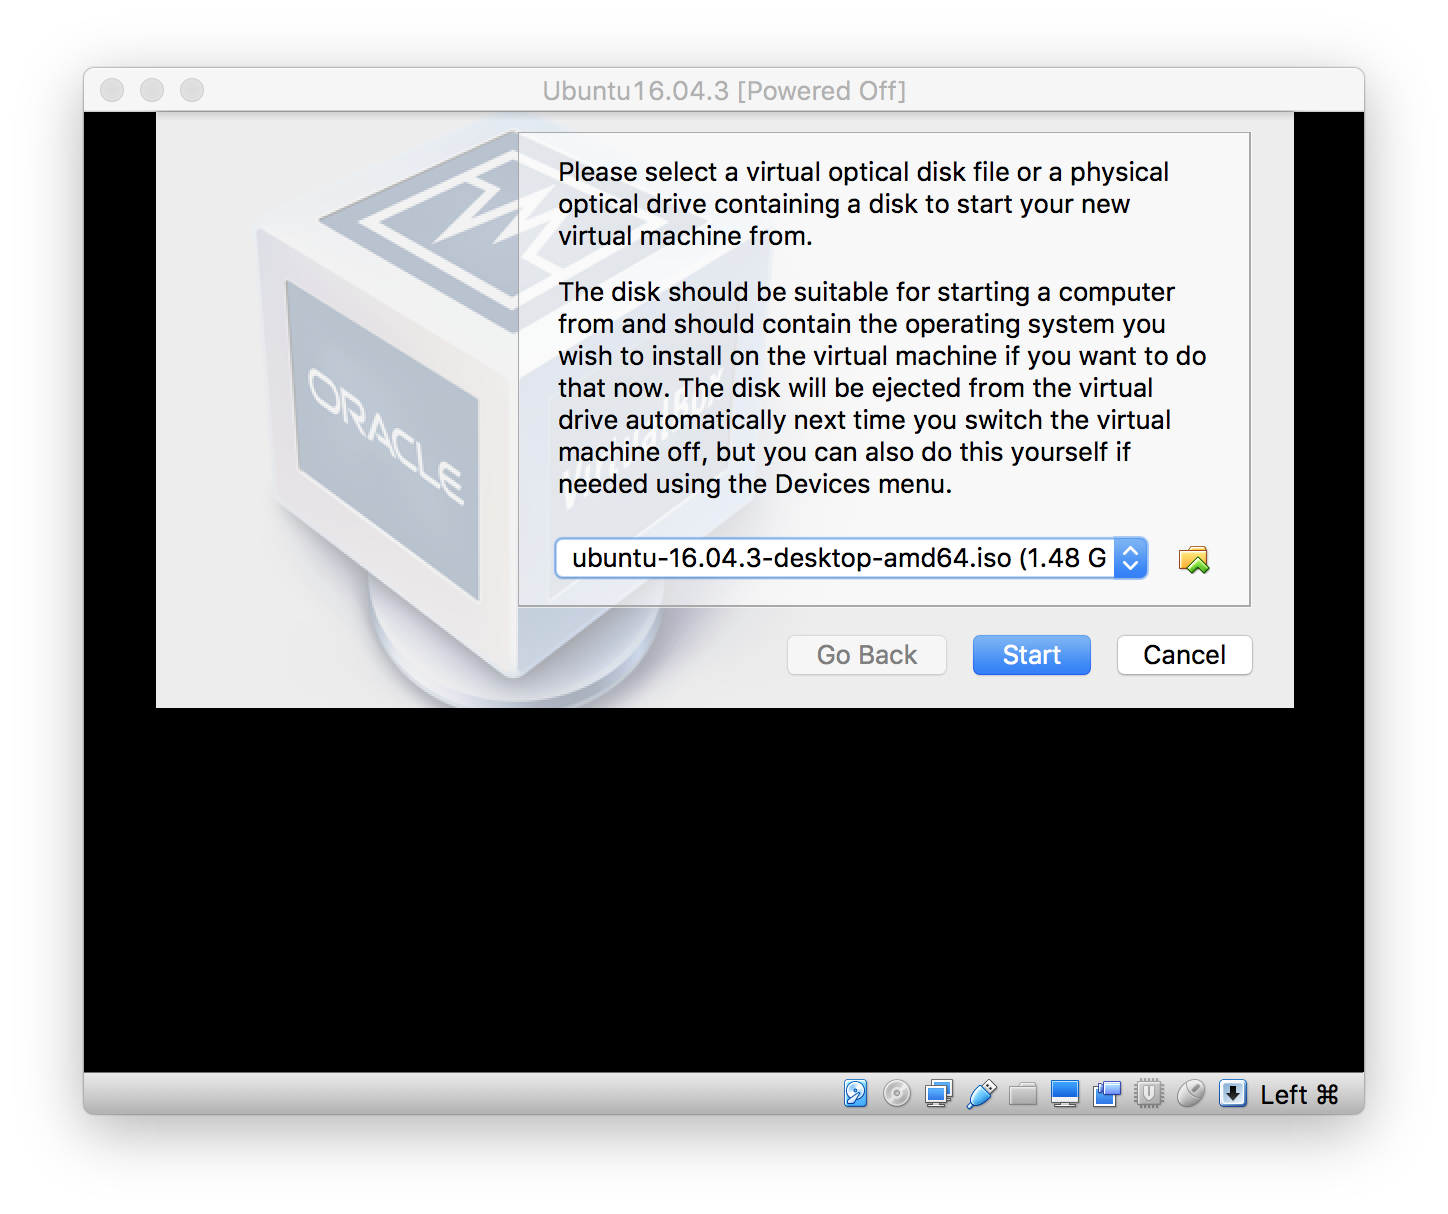
Here choose the ubuntu iso image you downloaded earlier, which should
be in your downloads folder, which is where VirtualBox will expect to
find it. In the above image, I've selected the
ubuntu-16.04.3-desktop-amd64.iso image I previously downloaded (as I'm
running VirtualBox on a Mac). Once your VirtualBox boots up, it
will install Ubuntu from the iso image you supplied. After
installing the Ubuntu operating system in your virtual machine, follow these instructions to install the guest additions. Also, make sure you select, under settings,
Option III: Do some combination of the above
If
you have the space, you may choose to do some combination of the
above. This may be the preferred route, as it allows you to
"simulate" multiple networks. For example, you can expose
RabbitMQ running in a container and hit a message queue from your
laptop's native browser (i.e., Safari, etc.).
Note that not all team members have to do the same approach...this is one of the many advantages to working within a dockerized environment.
STEP 2:
Create a personal docker hub ID and repository
The next step is to get real...that is, join the docker community. Go here
and sign up on the Docker Hub and create your own Docker ID. Signing
up on the hub will give you space on the docker hub where you can store
your own working containers, and leverage more than 100,000 containers
and images that other developers have already created (hello-world is
one).
STEP 3:
General intro to images and containers with a few examples
For
this first lab, we are going to simply run a few commands and make sure
that they work, which will also give you a taste of working within
Docker. First, you will need to document your exercises, and to
do this, you will use a Unix program called script. There are two
shell scripts that you will use (that utilize the script command), one
if you're working on linux, and the other if you're working on MacOS.
Contact the TA if you're working on Windows. We will be looking
to see if you have successfully run all the commands required in the
lab. Note that you may "play around" further with options and
other commands, even as you work through the lab. Therefore if
your script output shows additional commands etc., that's perfectly
fine (in fact it's great!). We will simply be grading the subset
of required commands that you are to follow when working through the
this lab and subsequent labs, and will ignore any output that we see
that is not part of the lab requirements.
First, make sure docker is running either on your laptop (Option I above) or in your VM (Option II) above. If you are working in a VM, do the following commands inside your Ubuntu VirtualBox VM.
Create a working directory (perhaps something like "~/mpcs51212/lab1" and in that directory type either runscript.linux.sh or runscript.mac.sh. That will launch a new shell (in your same window), but all your commands and output will be recorded in a file with an extension of "*.out". Once you are finished with Step 3 of this lab, simply type "exit" or press "^d" and you will exit the subshell and your activity will be saved in the script output. Your script output will be saved in a file with your login id and a date-time stamp. The filename will look something like "mark.Tue.Sep.19.17-59-26.CDT.2017.out". Your userid and time stamp will of course be different. This is the file you will submit for grading per the submission instructions below.
Ok, the first thing you're going to do is type "docker".
Docker will print out it's help file, which gives the various flags and
commands you can pass to docker. This is a fairly robust list of
options, but it will give you an idea of the wealth of things Docker
can do. Beside each of the flags and commands, you will see a
short description of what each flag and command does. For
example, beside the "exec" command, Docker prints out "Run a command in
a running container." Thus, the "exec" command can be used to run
a container. We will talk about images and containers in class.
Now type "docker exec --help". Docker will print out the help for the "docker exec" command. This will list the Usage pattern along with all the options and will again repeat what the command does, i.e., "Run a command in a running container." You can pass in the --help option with any docker command. Try getting help on the run command: type "docker run --help".
Now let's get to the meat of it. type "docker images". When you give the docker images command, it will print out all the Docker images that you have downloaded locally into your repository. In your case, you will likely have only one image, something like this:
$ docker images
REPOSITORY
TAG
IMAGE
ID
CREATED
SIZE
hello-world
latest
05a3bd381fc2 7 days
ago 1.84kB
This shows that in your local repository you have an image called "hello-world" and its Tag is "latest" and its Image ID is 05a3bd381fc2 and the size if 1.84 kilobytes. We will talk about tags and Image IDs in class.
Now that we've seen our Docker images, let's look at some containers. Type "docker ps -a". This will list all of the instantiated containers you have created (yes, even without your knowing it). When I run that command, I see this:
$ docker ps -a
CONTAINER ID
IMAGE
COMMAND
CREATED
STATUS
PORTS NAMES
ef60e564f68e
hello-world
"/hello" 20 seconds
ago Exited (0) 19 seconds
ago
vibrant_benz
7b06f097a37a
hello-world
"/hello" About a minute
ago Exited (0) About a minute
ago
suspicious_yonath
2c377206d2d1
hello-world
"/hello" 18 hours
ago Exited (0) 18 hours
ago
serene_edison
45406c7c504a
hello-world
"/hello" 18 hours
ago Exited (0) 18 hours
ago
youthful_feynman
17342cabc340
hello-world
"/hello" 18 hours
ago Exited (0) 18 hours
ago
thirsty_shaw
This
is a listing of all the containers I have executed. Wow, that's a
lot of containers. Every time I execute the docker run command, I
get a new container! How wonderful. It even gives my new
container an interesting name, such as youthful_feynman. It also
lists the Container ID for each container, the Image that the container
is based on ("hello-world"), and when I created it, it's exit status
(or if it's still running), any ports the container has bound (we'll
see this later), and the container's working Name. Note that I
know that none of the containers is currently running. I know
that because they've all exited. I can also type "docker ps"
by itself. When I do this, I'm asking Docker to print out all
running containers I have. There are none, so that command wiill
not print anything out if I don't have any currently-running
containers. It prints out something like this:
$ docker ps
CONTAINER
ID
IMAGE
COMMAND
CREATED
STATUS
PORTS NAME
Well, great. Let's get a real image down that can actually run for a while, why don't we? Type the following command: "docker run -it ubuntu:14.04 /bin/bash". Now be careful here and notice your NEW PROMPT:
$ docker run -it ubuntu:14.04 /bin/bash
Unable to find image 'ubuntu:14.04' locally
14.04: Pulling from library/ubuntu
bae382666908: Pull complete
29ede3c02ff2: Pull complete
da4e69f33106: Pull complete
8d43e5f5d27f: Pull complete
b0de1abb17d6: Pull complete
Digest: sha256:32c87496025f5cdc5e56b5e5393a4df102b14dd4928f702b2019b18faf1ec48a
Status: Downloaded newer image for ubuntu:14.04
root@0fc3e8b45816:/#
Your prompt is a tad different. It appears your username is now "root" and your prompt is a root #. Congratulations. You are IN the ubuntu container. Which container? In the container with the Container ID of 0fc3e8b45816. You can verify all this by bringing up a separate xterm window and running the following command:
$ docker ps
CONTAINER
ID
IMAGE
COMMAND
CREATED
STATUS
PORTS
NAMES
0fc3e8b45816
ubuntu:14.04
"/bin/bash" 3 minutes
ago Up 3
minutes
determined_hawking
There's your Container ID listed 0fc3e8b45816. It's status is "Up 3 minutes". That means your container is running! You can play around all you want in your new Ubuntu container. Play around by typing a few commands at the # prompt, such as ls -la, ps -ef, echo $SHELL, df, date, etc. Try running "apt-get update" now, which will update your ubuntu (debian) packages to the latest and greatest. Amazing. You just modified the contents of your container. Now type "exit" or press "^d" and you'll be back at your original $ prompt. Try typing "docker ps" again. Notice nothing is currently running. That's because you exited your container, and it stopped running the /bin/bash shell. Type "docker ps -a" again.
$ docker ps -a
CONTAINER
ID
IMAGE
COMMAND
CREATED
STATUS
PORTS NAMES
0fc3e8b45816
ubuntu:14.04
"/bin/bash" 10 minutes
ago Exited (0) About a minute
ago
determined_hawking
ef60e564f68e
hello-world
"/hello" 2 hours
ago Exited (0) 2 hours
ago
vibrant_benz
7b06f097a37a
hello-world
"/hello" 2 hours
ago Exited (0) 2 hours
ago
suspicious_yonath
2c377206d2d1
hello-world
"/hello" 20 hours
ago Exited (0) 20 hours
ago
serene_edison
45406c7c504a
hello-world
"/hello" 20 hours
ago Exited (0) 20 hours
ago
youthful_feynman
17342cabc340
hello-world
"/hello" 20 hours
ago Exited (0) 20 hours
ago
thirsty_shaw
This ends lab 1. Submit your saved script as per the instructions below.
References:
You may find the following references helpful:
General Docker Tutorial Links
Learn Docker in 12 Minutes Youtube
Demystifying Docker Youtube
TutorialsPoint: Docker Tutorial for Absolute Beginners
Submitting:
Create
a Bitbucket Repository called Lab 1. Upload your lab 1 script output
and any supporting materials to this repo. Make sure that the user name
"johnhb" has access to this repo. Please include a README text
file that contains any instructions for
the TAs to assist with grading, and design notes are often the most
useful thing you can provide. We do not usually need any info on how to
compile your code unless your code layout is arcane.