Homework #6: Due: Tuesday August 16th, 2016 @ 11:59pm
In this assignment, you will get some practice with header files, command-line inputs, and ppm files. You should submit the following files:- hw6/image-effects.h
- hw6/image-effects.c
- hw6/ppm.h
- hw6/ppm.c
- hw6/editor.c
- hw6/Makefile
PPM Image Format
The PPM (or Portable Pix Map) image format is encoded in human-readable ASCII text. For those of you who wish to have the experience of reading real documentation, the formal image specification can be found here.Sample ppm file:
  P3
  4 4
  255
  0  0  0   100 0  0       0  0  0    255   0 255
  0  0  0    0 255 175     0  0  0     0    0  0
  0  0  0    0  0  0       0 15 175    0    0  0
  255 0 255  0  0  0       0  0  0    255  255 255
Image Header You can think of the image as having two parts, a header and a body. The header consists of four enteries:
  P3
  4 4
  255
P3 is a "magic number". It indicates what type of PPM (full color, ASCII encoding) image this is. For this assignment it will always be P3.Next comes the number of columns and the number of rows in the image (4 x 4).
Finally, we have the maximum color value 255. This can be any value, but a common value is 255 (can you guess why?).
The way you see the header presented is how it should be spaced out.
Image Body
The image body contains the actual picture information. Each pixel of the image is a tiny, colored square. The color is determined by how much red, green, and blue are present. So, 0 0 0 is the first color of the image, which is black, and the last pixel in the image is 255 255 255, which is white. By varying the levels of the RGB values you can come up with a vast number of colors in between.
Note that color values must be separated by a space, but additional whitespace is ignored by the image viewer.
We used additional whitespace in the sample ppm above to format the image so that it is easy for a human to understand, but the computer doesn't care if everything is on one line, if there is one line per line of the image, or some mix.
We will keep 1 line of text = 1 line of the image for this assignment to make the images easier to read in a text editor.
Putting it all together
The example image above would look something like this:
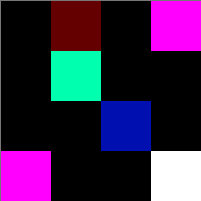
Keep in mind, each square is one pixel, so the real thing is much smaller (the rendered image was blown up by 5000%).
How to view PPM files
While PPM files are easy to view as text (you can use Text Editor/Notepad, for instance), and easy to work with in code, they are highly inefficient. Most modern image formats use some kind of compression to make their size reasonable while preserving the image appearance. This is not to say that PPMs don't still have some life in them - one modern use for PPM is an intermediate format when converting images from one type to another.
You will need to install a program to view these images on your machine. We’ve checked that the default image viewer called eog (eye of gnome) and GIMP (GNU Image Manipulation Program) on the Linux machines work well. Presumably similar programs in Windows and Mac OS-X should work as well (like GIMP). Some students have reported odd coloration with certain programs in the past.
Your Assignment : Image-Effects Editor
First, your program should accept the input and output filenames of the image via the command line. If the user does not enter in both the input and output filenames, then print a usage statement and exit the program. Second, the user will be able to provide additional command line options to apply effects to the input image, which will be saved to the output image. This part is discussed in the "Command Line Options" section below. The usage of the editor program you write will be:Usage: editor input output [-nr] [-ng] [-nb] [-f]
We have done much of the image work for you. You will need to download hw6resources.zip which includes the ppm.h and ppm.c files. These files contain an image struct and Image type as well as the useful functions:
Image* ppm_mkImage(int width, int height);
Image* ppm_loadImage(const char* filename);
void ppm_freeImage(Image* img);
void ppm_saveImage(const Image* img, const char* filename);
Help documentation for all the functions is located in the .h file. You will need to think about how to use these functions within your assignment (you may not use them all). You may also add functions to the ppm.h/ppm.c files.
How do we represent images in memory? In modern color images each pixel is represented by three bytes, one for each of the colors Red, Green and Blue. A byte can hold values from 0 to 255 so a pure Green pixel would have the value (0, 255, 0). In memory we connect these pixels together one after another, starting with the pixel in row 0, column 0, then the pixel in row 0, column 1, etc… until we reach the last pixel. Each pixel is arranged in memory as three bytes. First a byte for Red, then a byte for Green, then a byte for Blue
In C we need a data type which takes up only one byte. While we might want to use int to represent these numbers from 0 to 255 this is not a feasible choice. Int’s take up too much space (often four bytes). Instead, we’ll use char which, on all computers today, takes up only a single byte. We usually use chars to represent characters. As we learned recently though data types merely suggest uses - C will let us break the rules.
Note: The pixel data (i.e., unsigned char * data inside the image struct) is stored as a linear array of characters. The pixel (0,0)'s color is stored in indices 0-2 in RGB order (i.e., R is at index 0, G is at index 1, B is at index 2. Always in sequential order), pixel (0,1)'s color is stored in indices 3-5, pixel (0,2)'s color is stored in indices 6-8, etc...
Command Line Options
The program should also provide the following command-line arguments.
- The -nr will change just the RED color numbers into their "negative". That is, if the red number is low, it should become high and vice versa. The maximum color depth number is useful here. If the red were 0, it would become 255; if it were 255 it would become 0. If the red were 100, it would become 155. It should make changes to the data array as described above.
- The -ng , -nb will change just the GREEN (-ng) and BLUE (-nb) color numbers into their "negative".
- The -f will flip the image horizontally. That is, the pixel that is on the far right end of the row ends up on the far left of the row and vice versa (remember to preserve RGB order!). Make sure your entire program is working before trying to implement this last option.
The user can provide zero or more command line options and they can specify the options in any order. But you cannot assume the input and output file names will come before the options. They can be intermixed with the options but you can assume the input filename will always come before the output filename.
You will write these effects as functions inside their own library, which will be setup in the image-effects.h and image-effects.c. The library will contain the following functions:
void img_effects_negRed(Image* p); // negates the RED color numbers into their "negative"
void img_effects_negGreen(Image* p); // negates the GREEN color numbers into their "negative"
void img_effects_negBlue(Image* p); // negates the BLUE color numbers into their "negative"
void img_effects_flip(Image* p); // flips the image horizontally.
Sample Inputs/Compiling
Inside the hw6-resources folder you will see a sample input folder containing the following images:
- blocks.ppm - Some solid blocks of color
- cake.ppm - A picture of a slice of cake on a plate
- squares.ppm - Some boxes
- tinypix.ppm - The example image from above
You can use these as your input-images for your program.
You will need a Makefile for this assignment (We will talk about this on Monday). For now, you can compile your programs as such:
gcc -std=c99 editor.c ppm.c image-effects.c -o editor
./editor blocks.ppm blocks_out.ppm -nr    (*This will negate the red component and save the effect to blocks_out.ppm *)
Your Main File
You will write a main function inside the editor.c file. Make sure to include "ppm.h" and "image-effects.h" inside the editor.c file to get access to the type definitions and functions.
Style
At the top of your C file, write a comment with your name, etc., in the following form:
              /* Jane Doe, jdoe */
              /* CS152, Summer 2016 */
              /* Homework 6 */
Comments, where they occur, should be helpful and precise. Omit superfluous comments:
int a = b + c; /* I'm adding b and c and naming it a! */
Your code should be no more than 80 columns wide.
Do not write more than one statement on a line.
Do not submit code that does not compile. If a function is broken, and makes compilation impossible, comment out that function and submit the rest. Non-compiling code will receive little to no credit.
Submitting Your Work
Save and commit all your files stated above . Recall that you will need to add your work before you commit it. (Also, notice that in the -m message you include at commit time, -m is simply a command-line option.)
Commit your work early and often. We do not grade intermediate commits, only the work as it stands at the deadline. If you have any issues with subversion, not only your instructors but your classmates can help you. Most of the students in this class have at least one full quarter of experience running subversion.
If, for any reason, perhaps due to a late add, you do not have a CS repository, save your work somewhere you can easily get it and send mail to Lamont. We'll get you set up with a repository in time to make the deadline.